Raid

In-depth look at - Objective: Defeat Oryx, The Taken King

Welcome to part 3 of my look into the King’s Fall Raid - normal. This is the final part in my 3-part series. Again, I have broken up this post into two parts. The first part will discuss the process of players figuring this fight out. The second part will see how all these pieces fit together and I’ll briefly explain how to defeat the boss.

If you haven't read parts one (Power the Glyph) and two (Daughters of Oryx) then I recommend you do so. They can be found at HERE for Part 1 and HERE for Part 2.

**If you have yet to finish the raid and wish to go in blind, I recommend you stop reading now. Otherwise, please enjoy. **

Oryx is one of the most difficult and rewarding fights of the game. This difficulty comes mostly from the players being able to deal enough damage, and how fast they can complete each part of this encounter. Luckily, half of this fight is very similar to the daughters’ fight. If you haven’t read my analysis of that fight I recommend you check out my previous post as we will be building upon the mechanics from that fight.

Process of players figuring out each of the pieces:

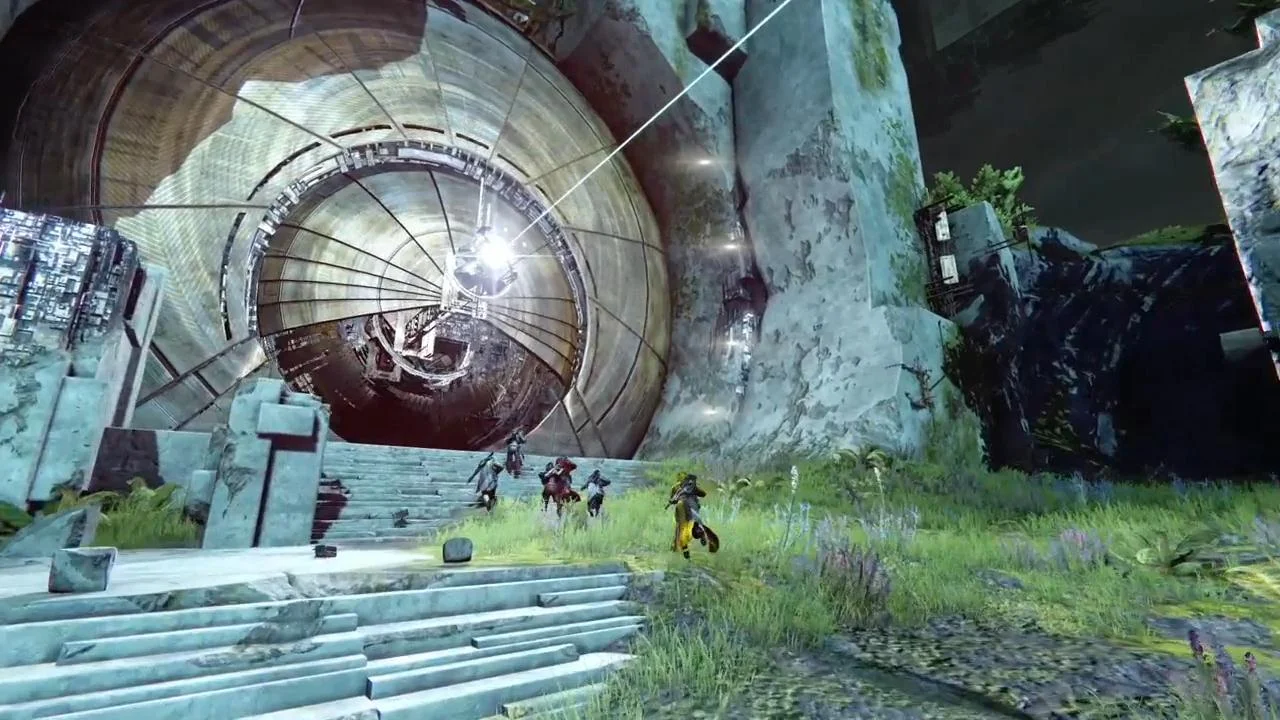
Upon defeating the Daughters of Oryx the players will see a glowing orb at the edge of the map, much like the ones on the “Torn Between Dimensions” platforms. Upon approaching it, it will fly down off the cliff.

A second later, a giant version of Oryx slides up to tower over the player. This intimidating sight will cause all the players to back away from him.

He will proceed then to spawn two groups of Taken Thralls, one between him and platform three, the other between him and platform two. Immediately after he spawns these enemies, he will additionally spawn a Taken Knight on switches two and three. Players at this point are going to open fire on everything.

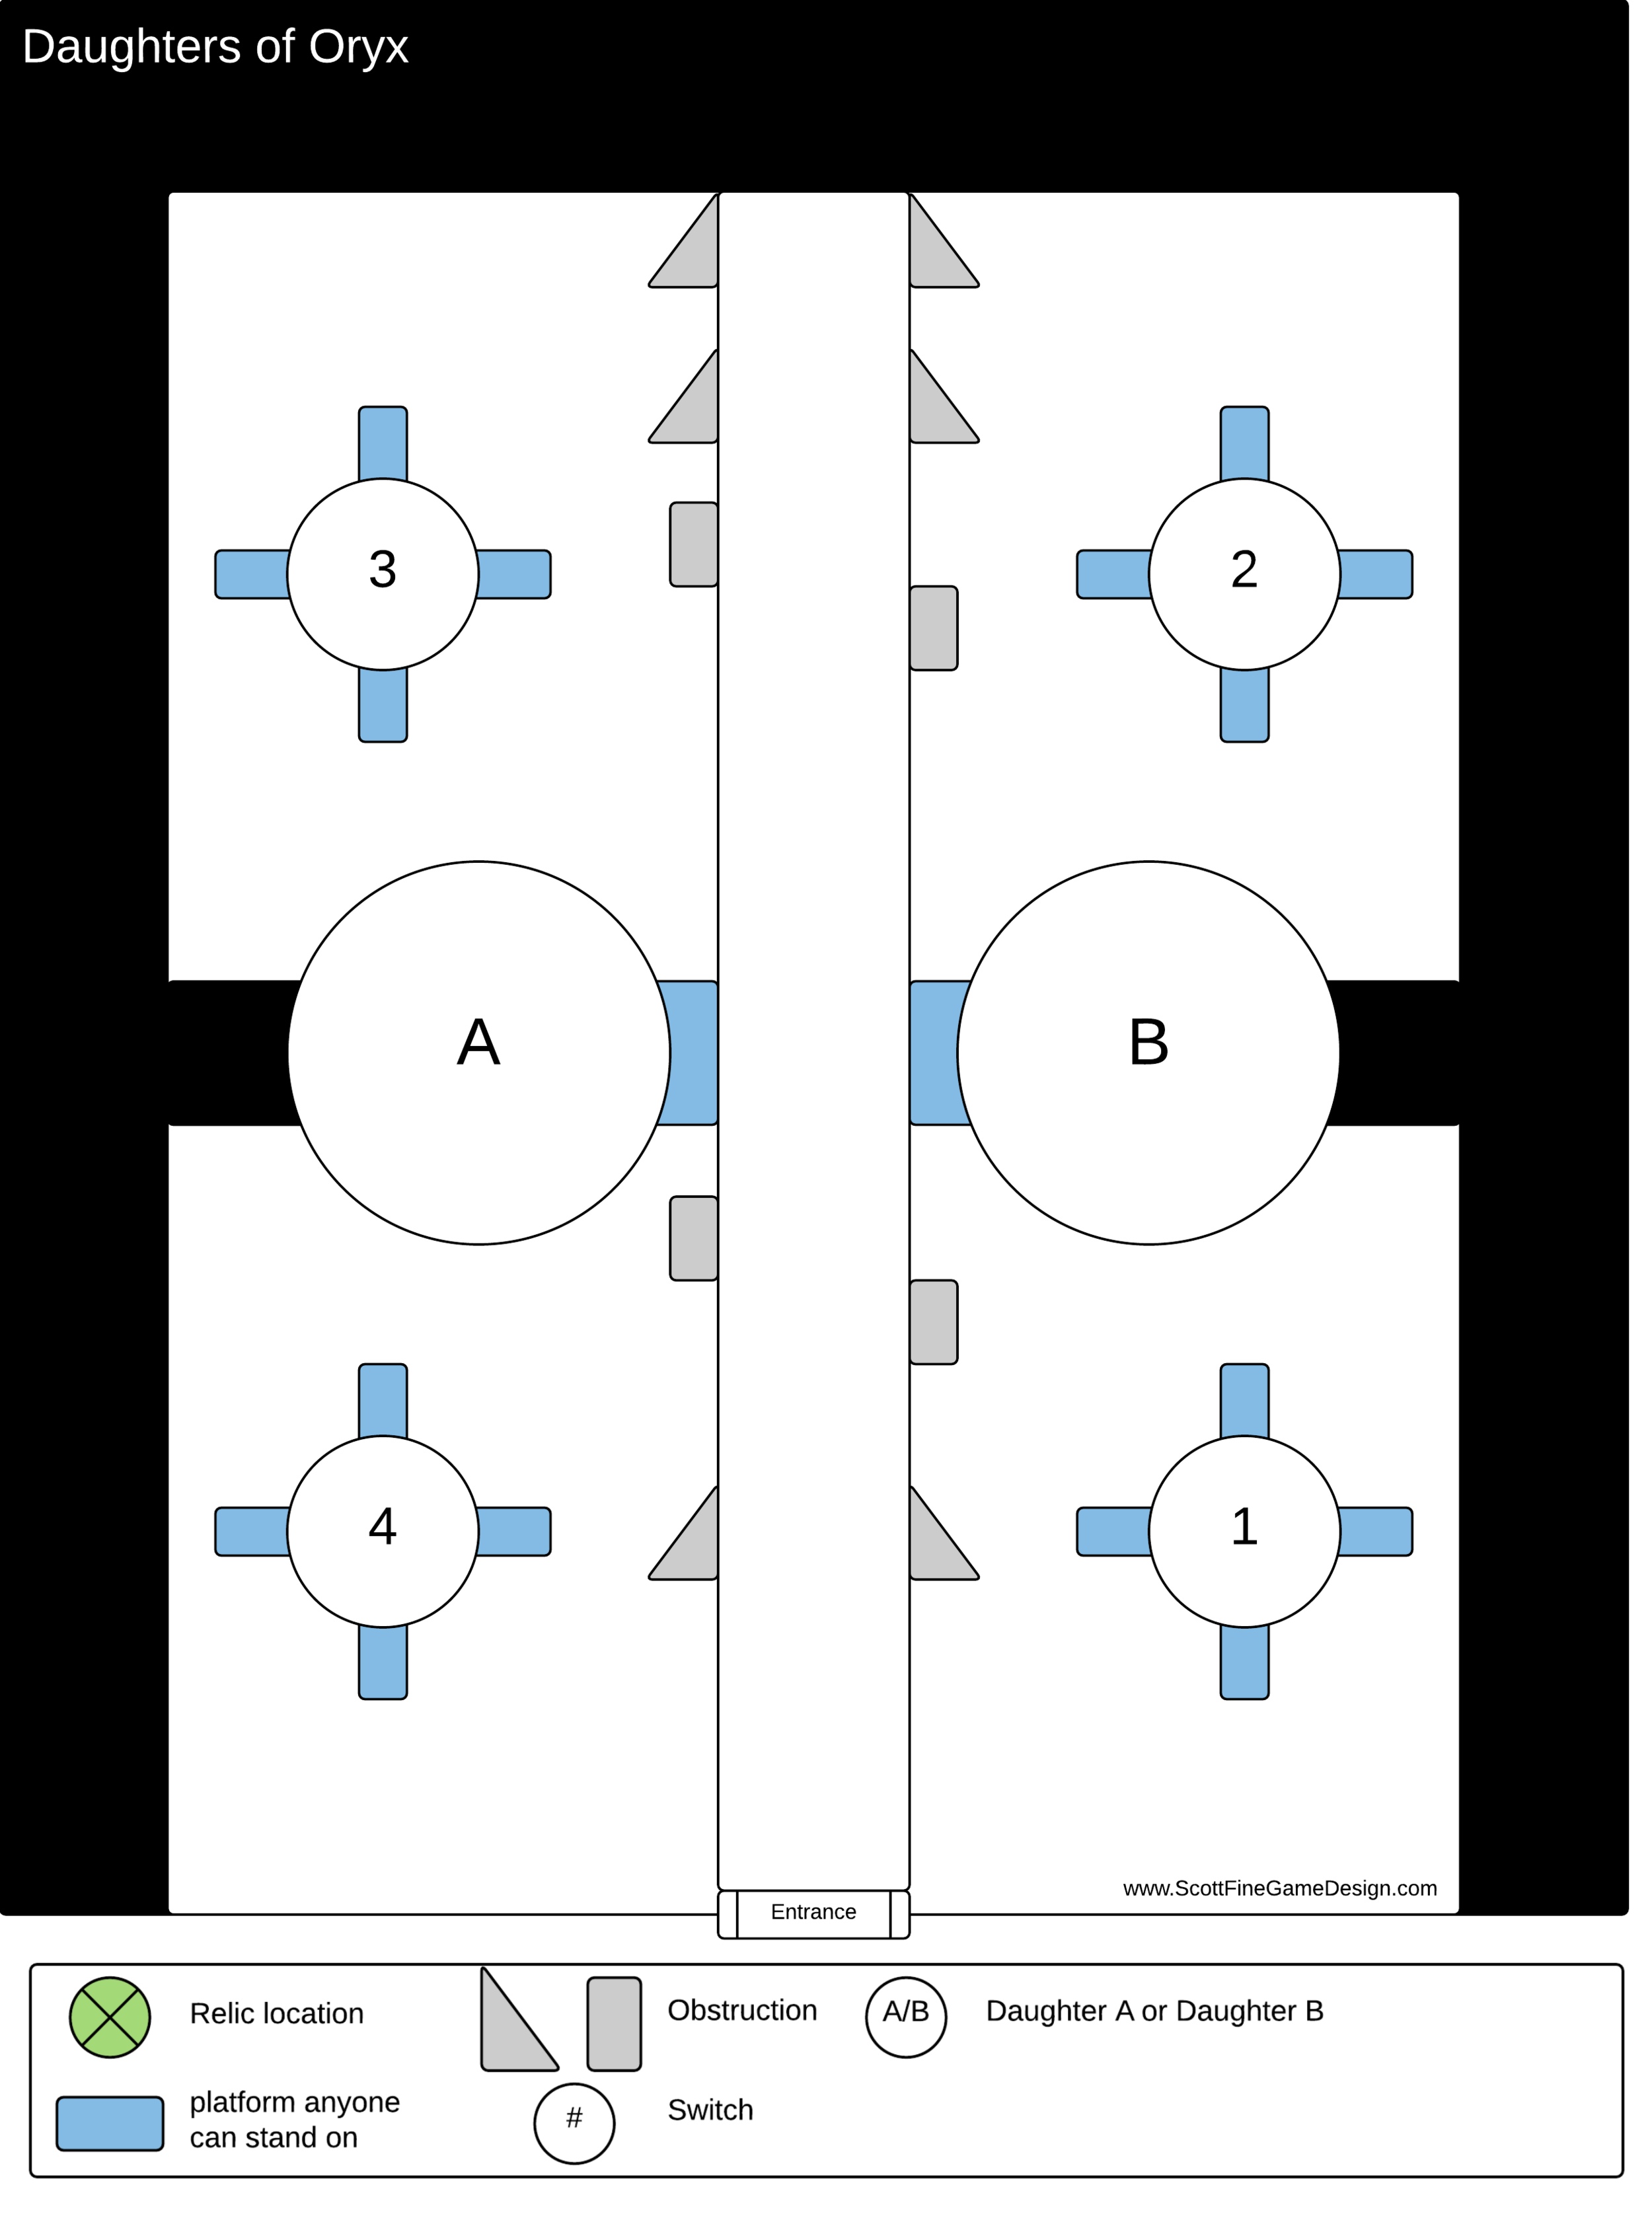
Maps built in Lucidchart

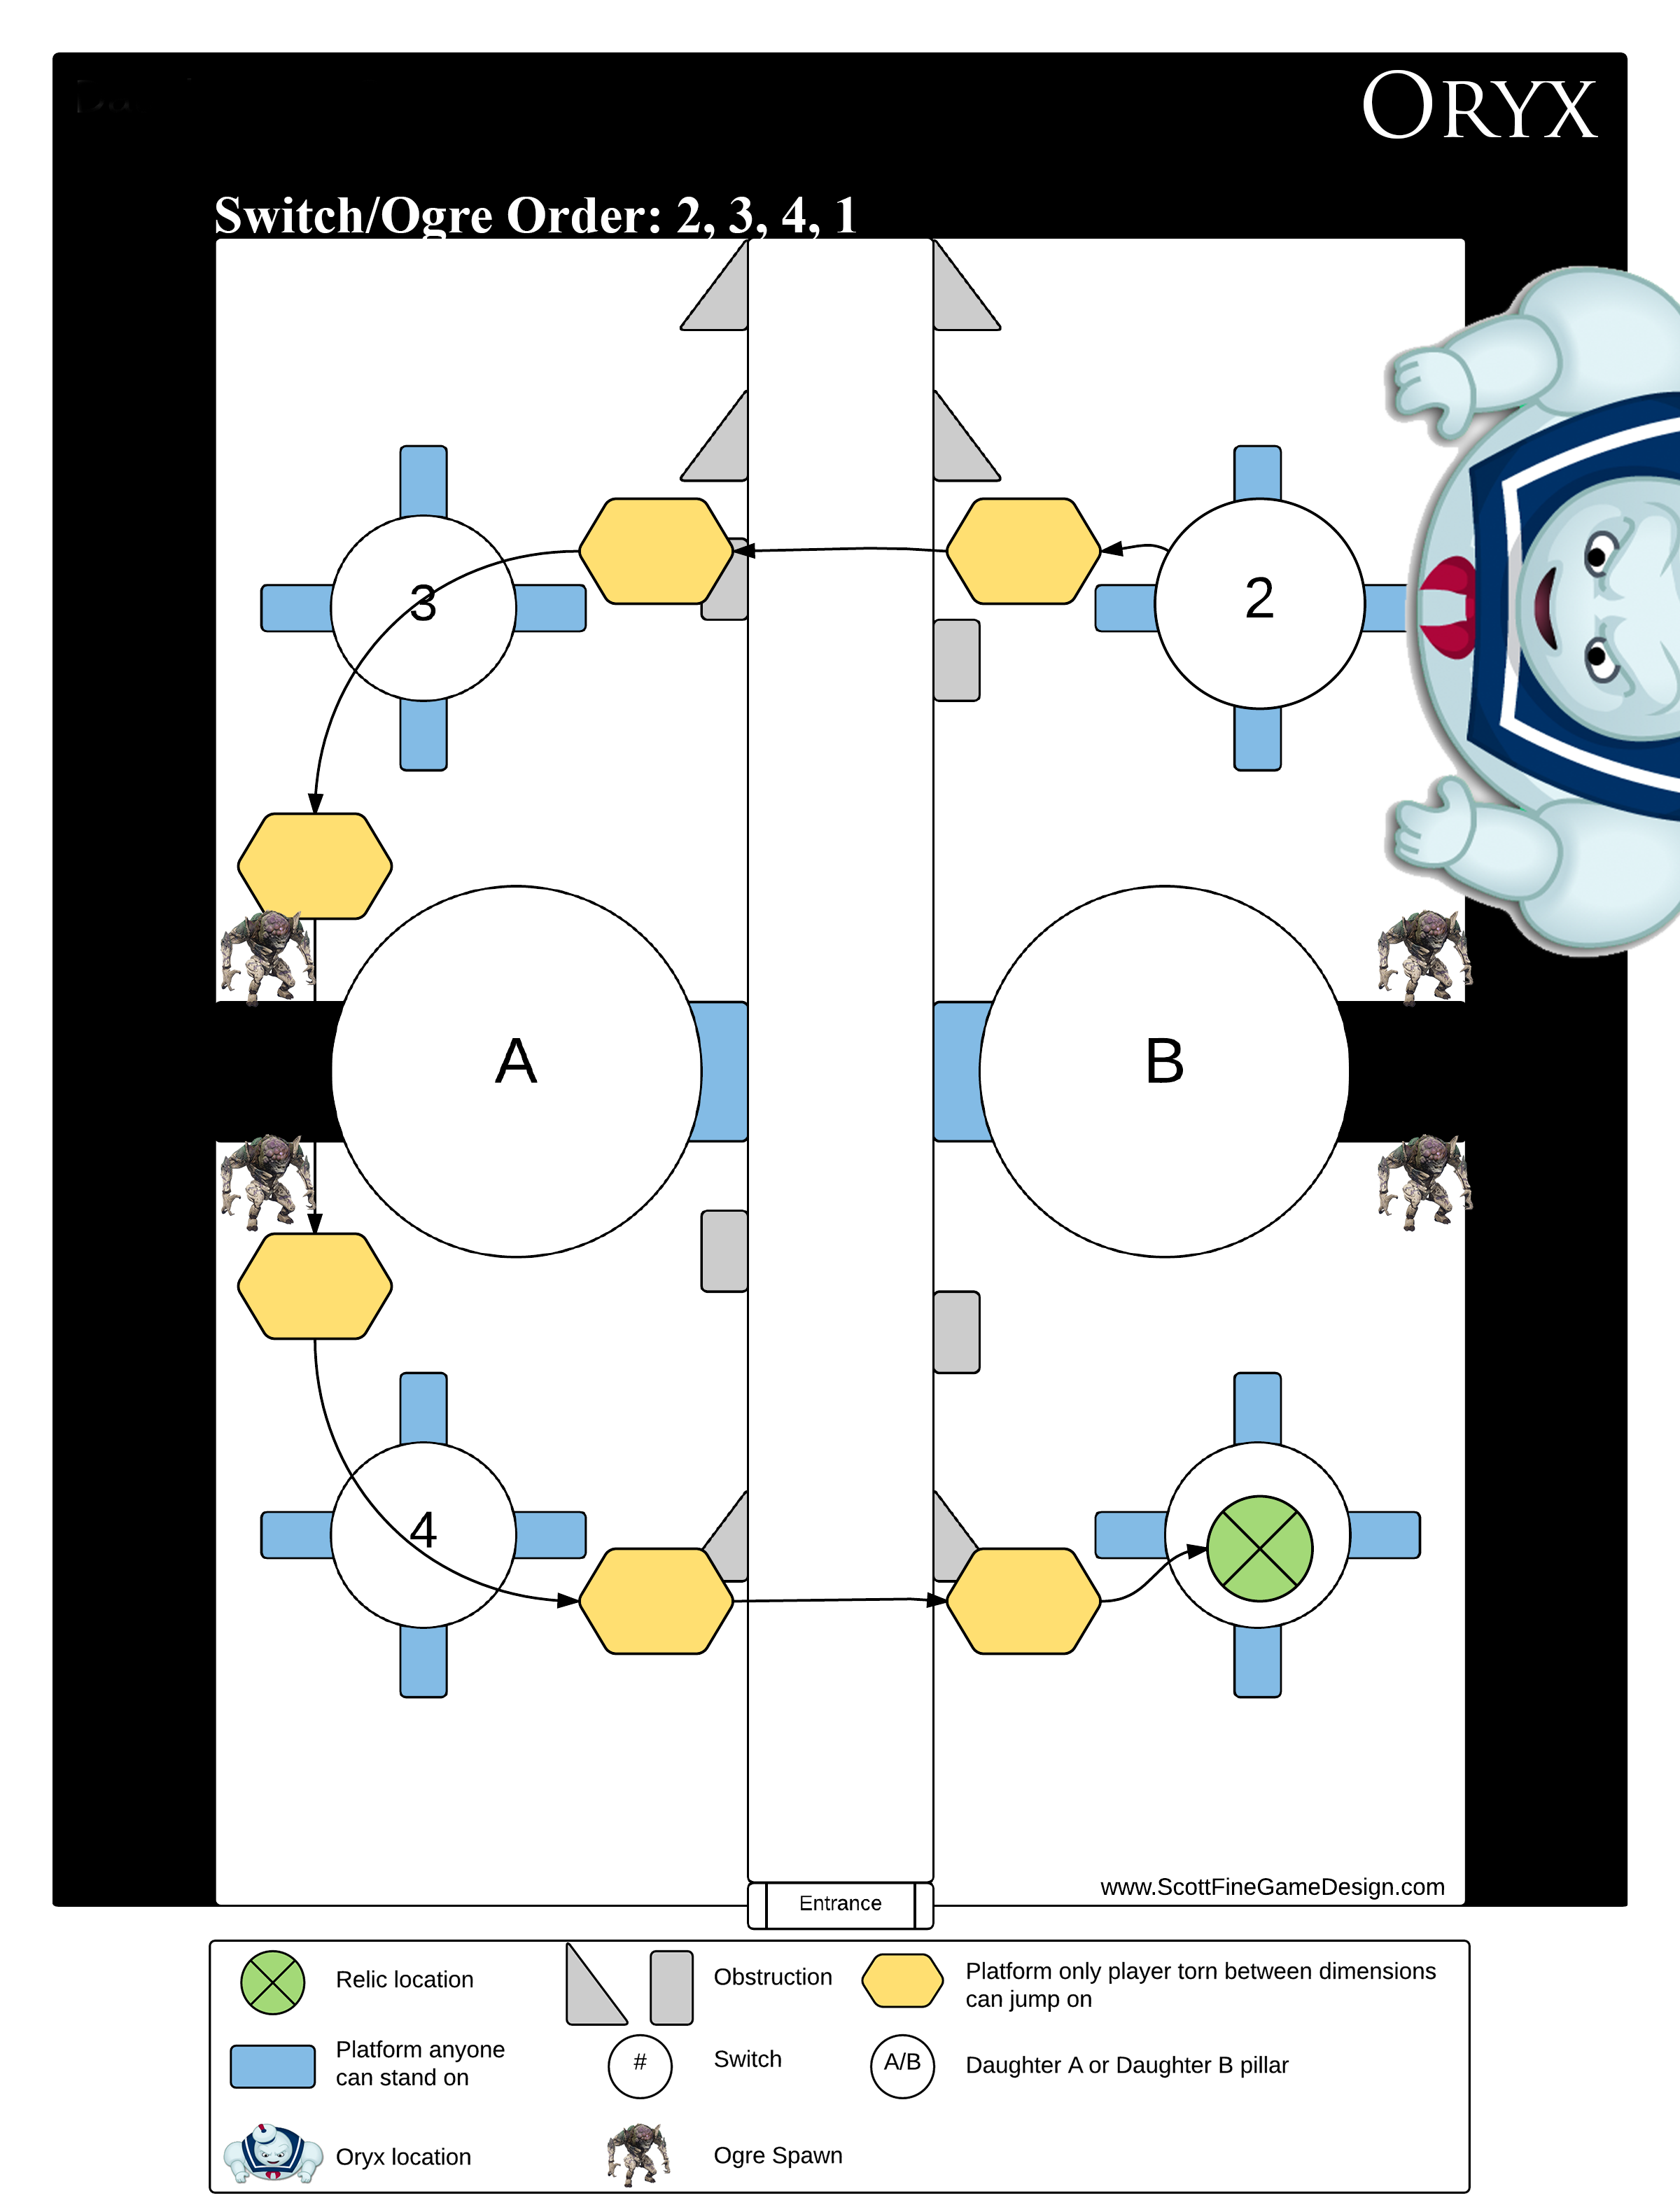
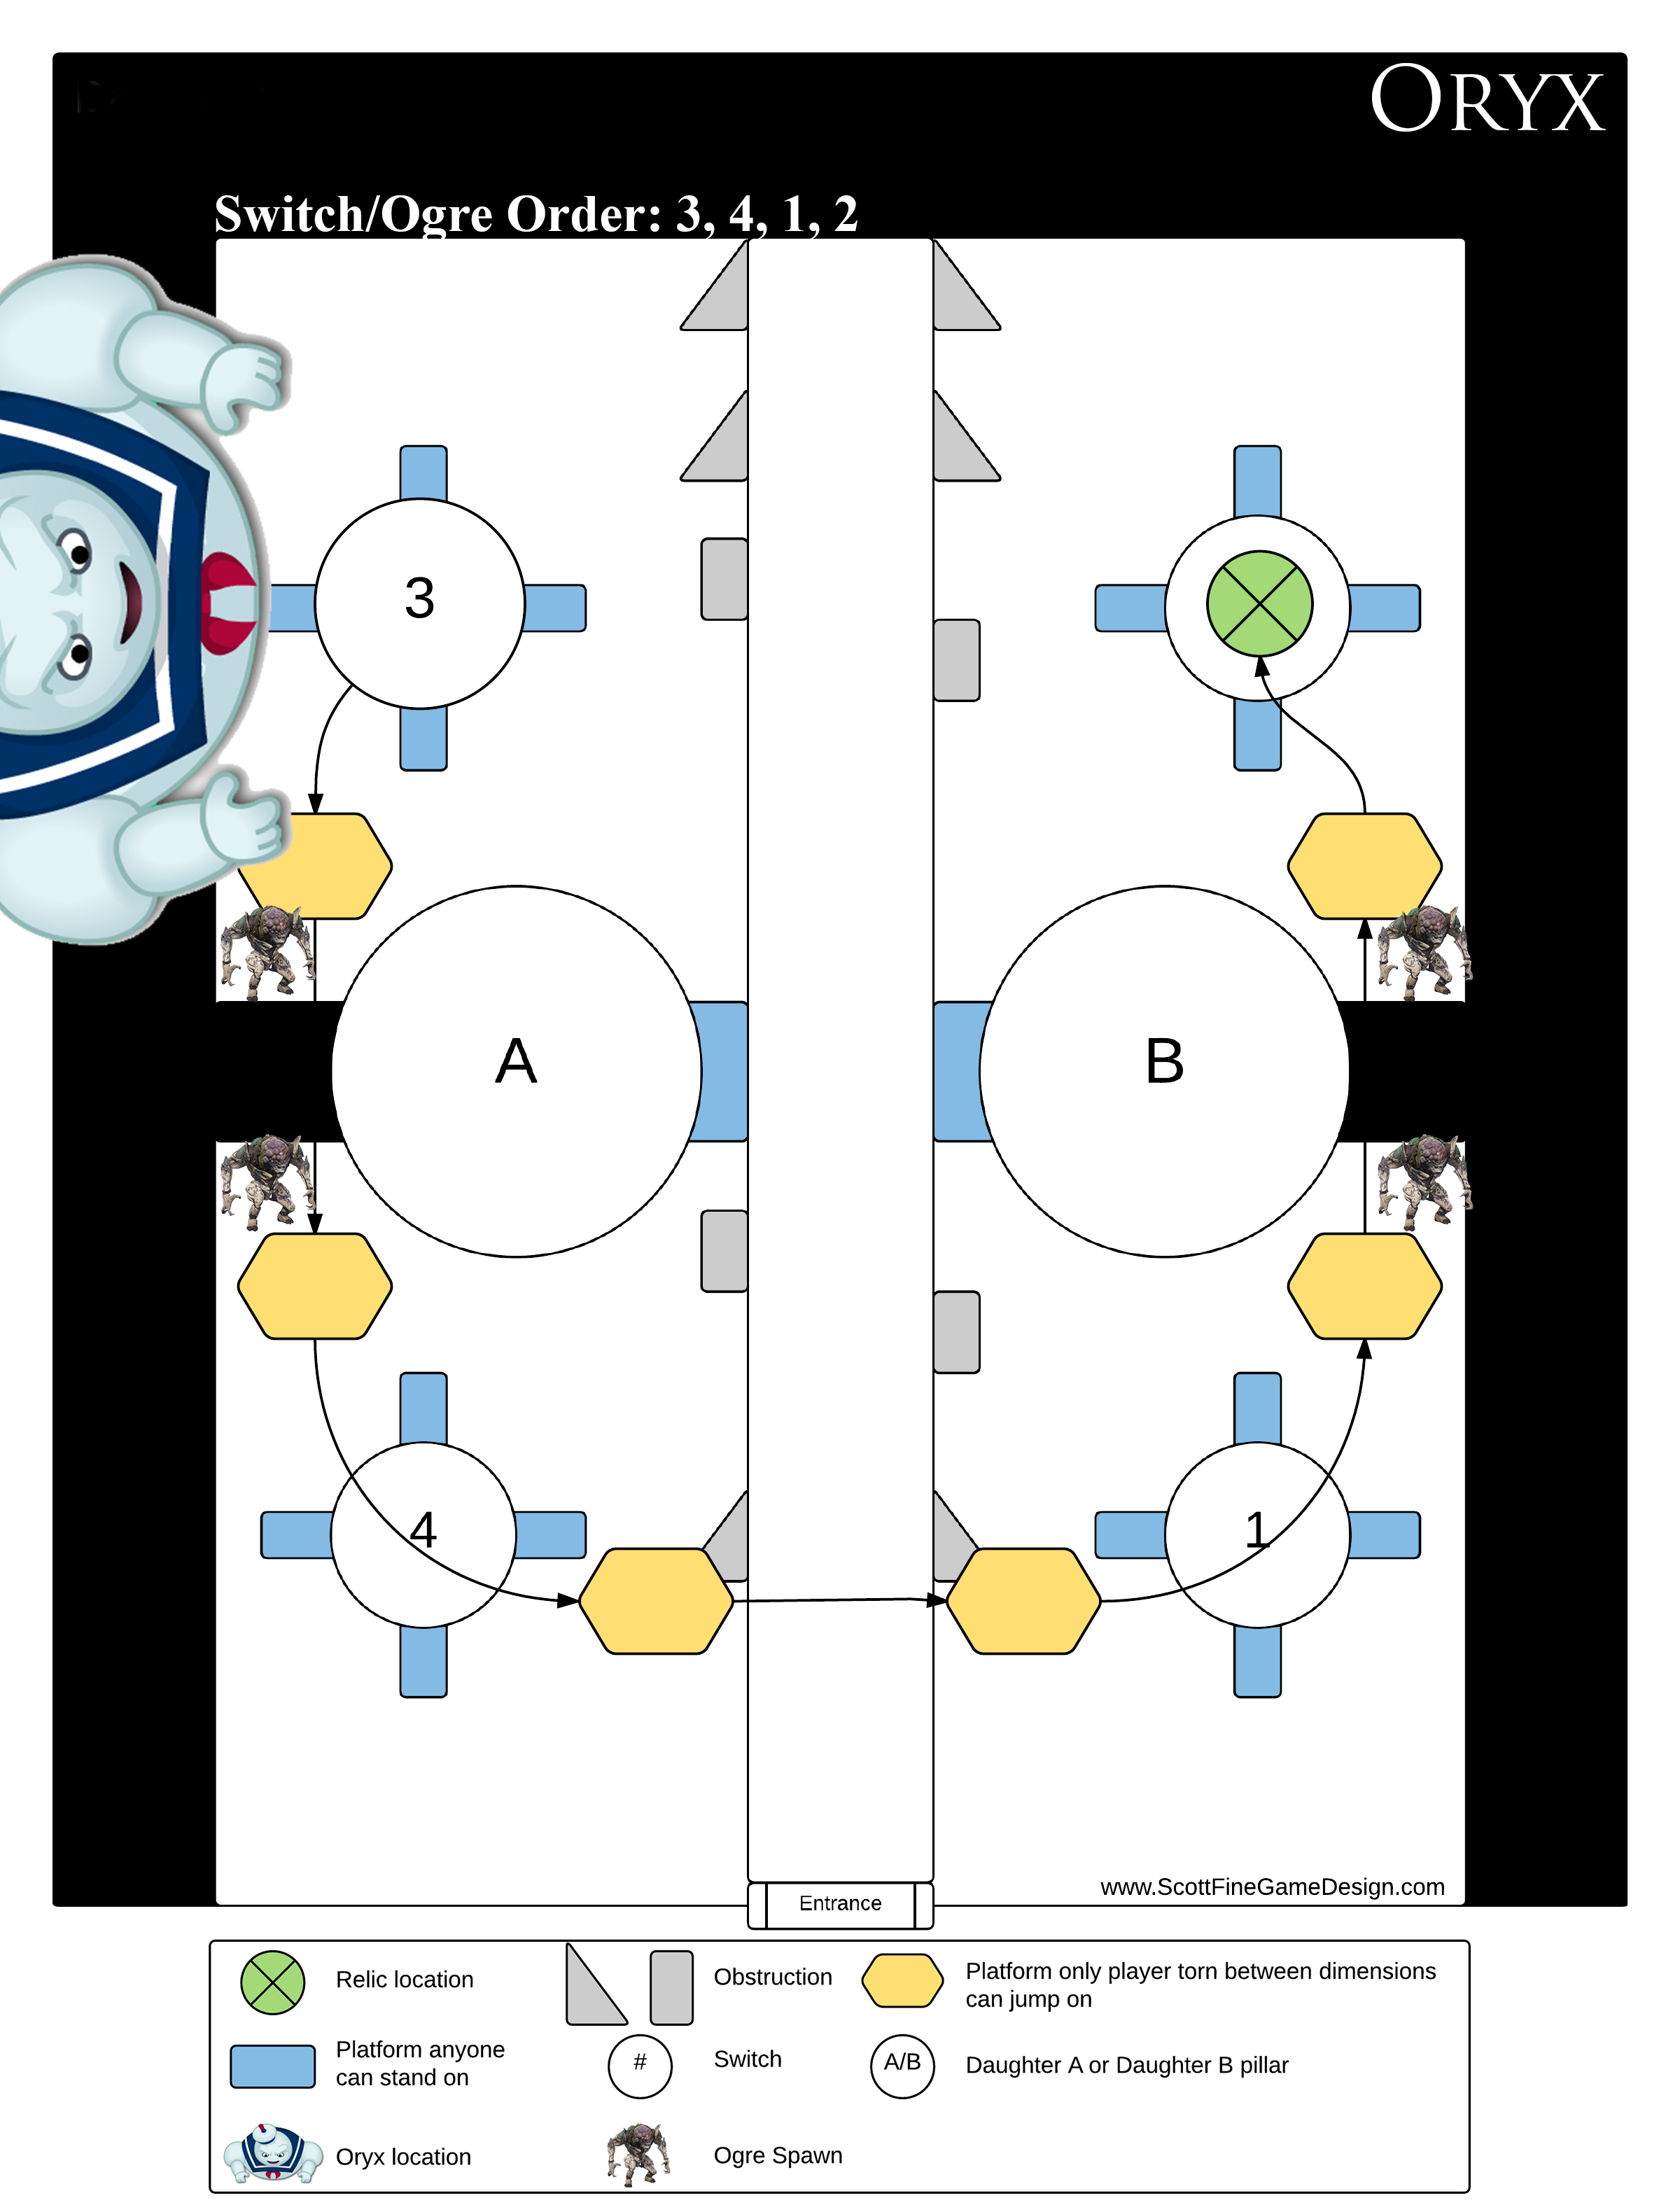
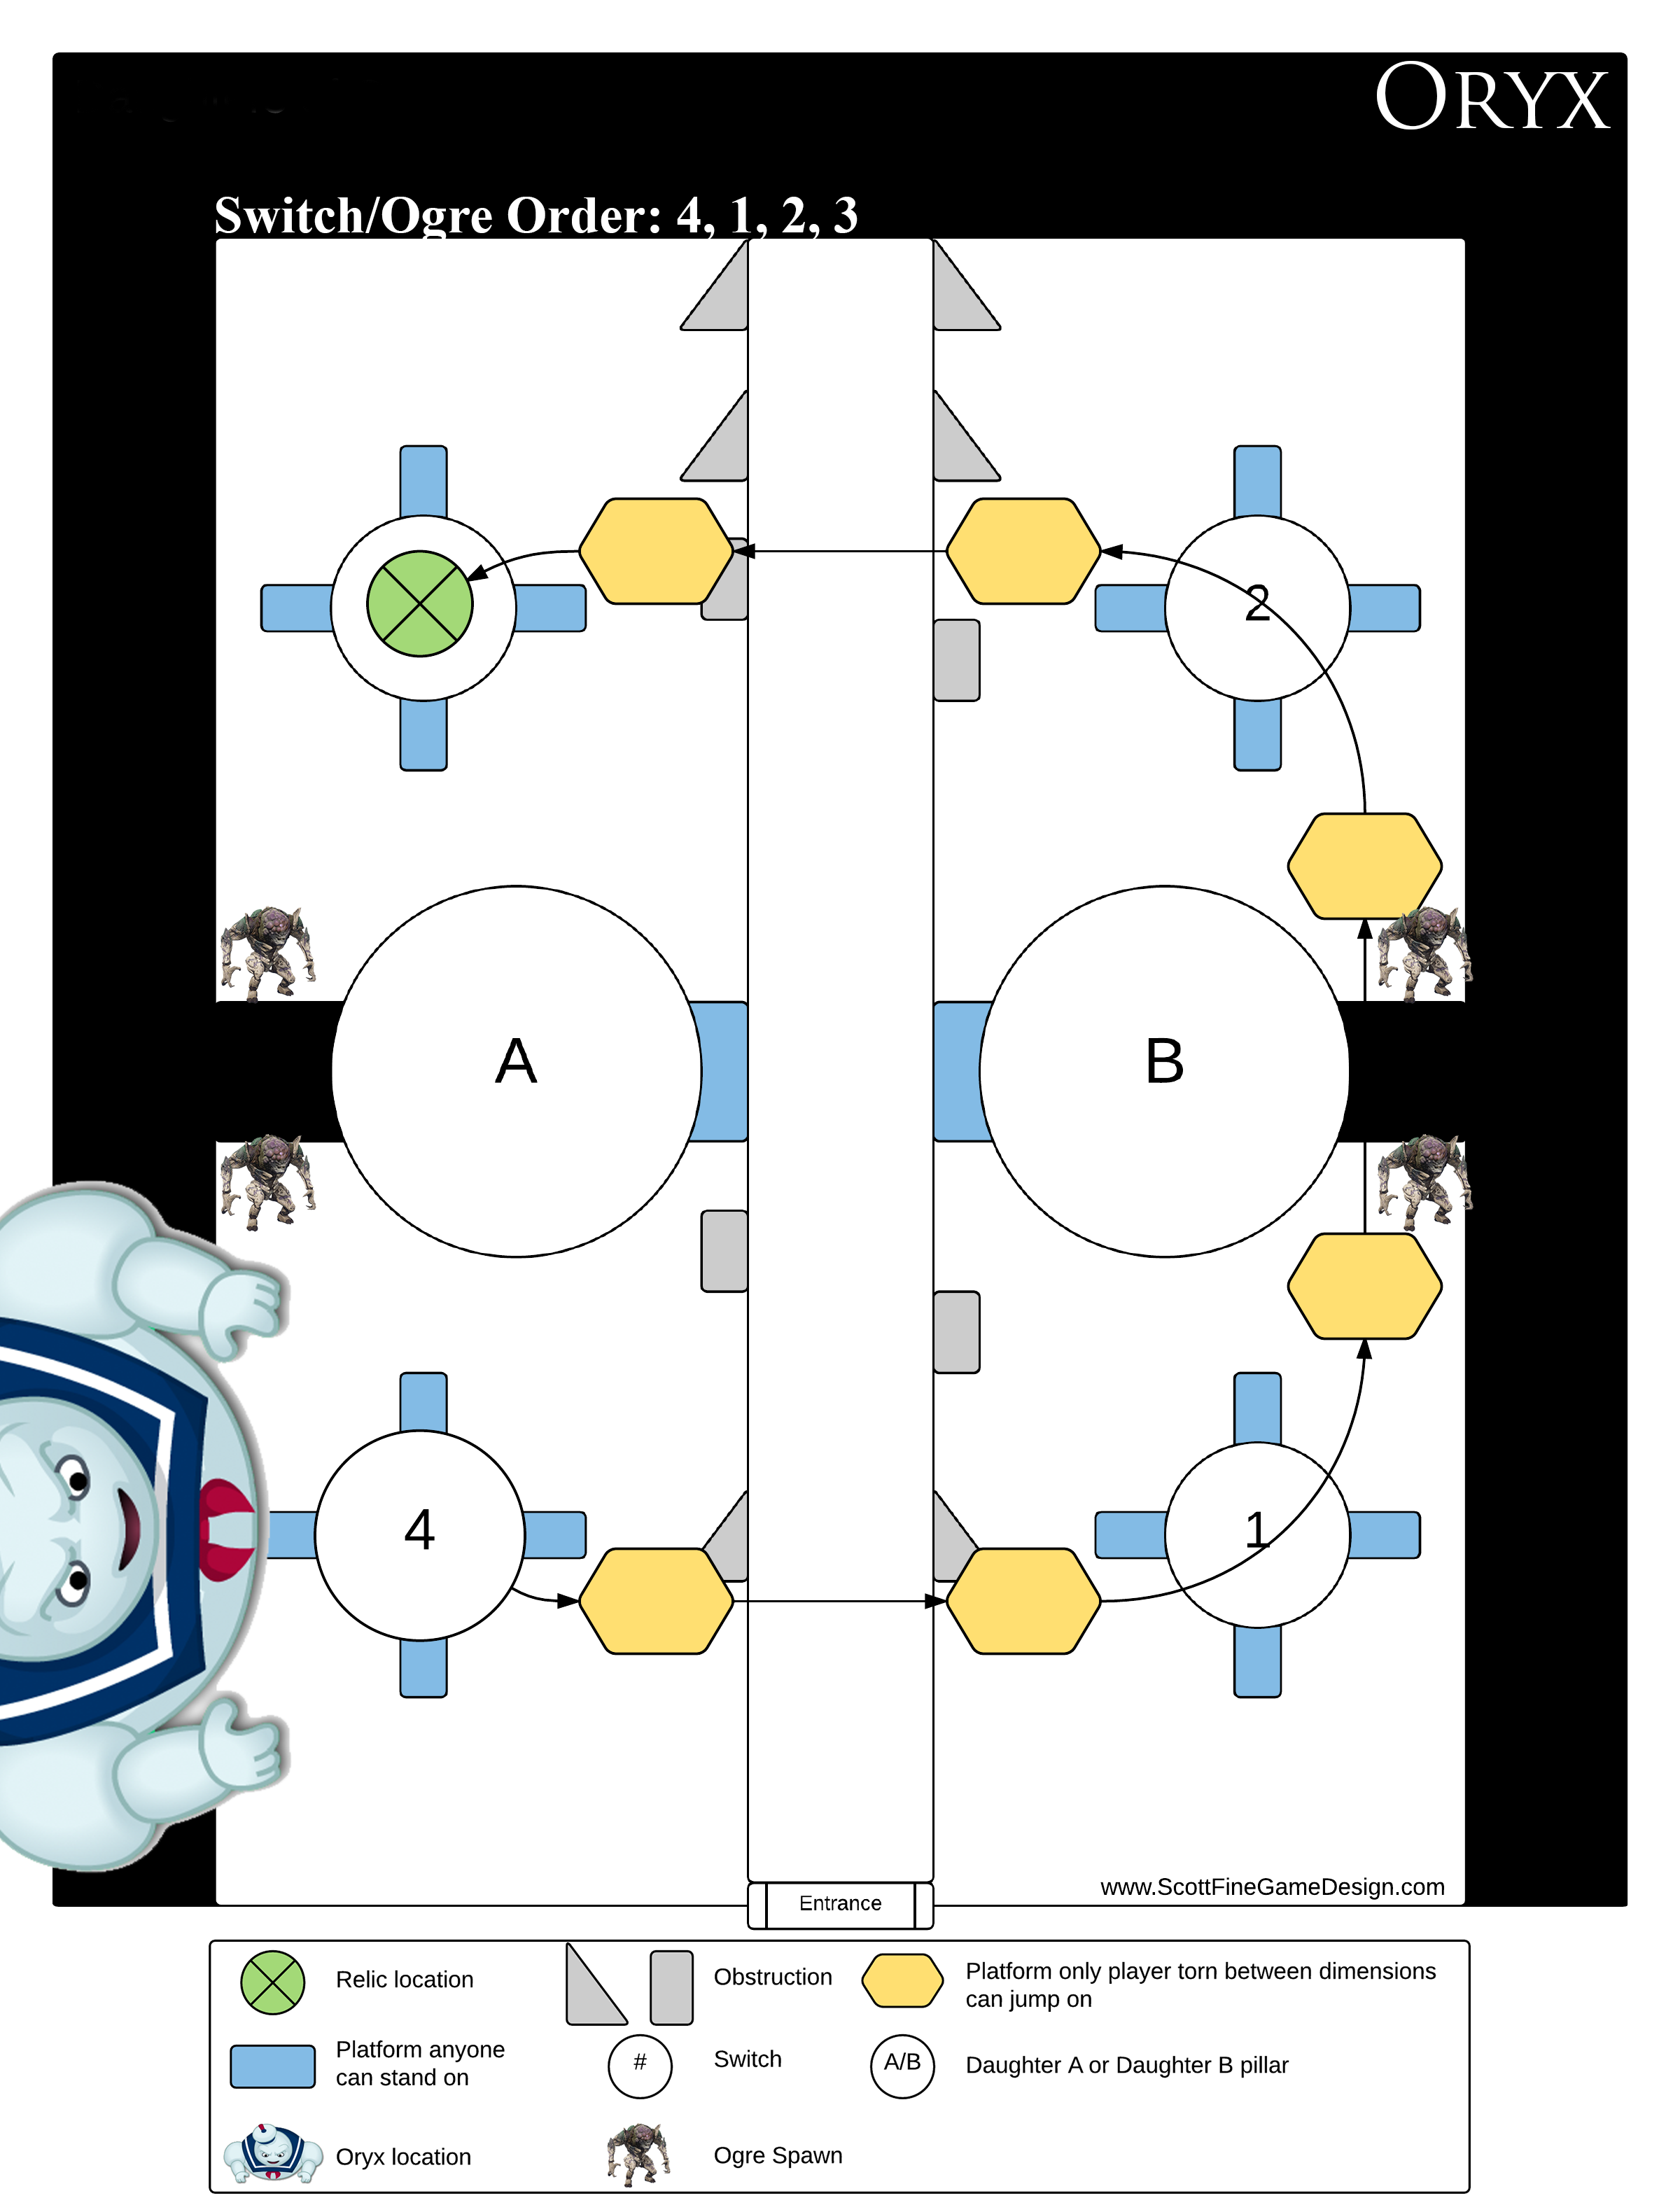
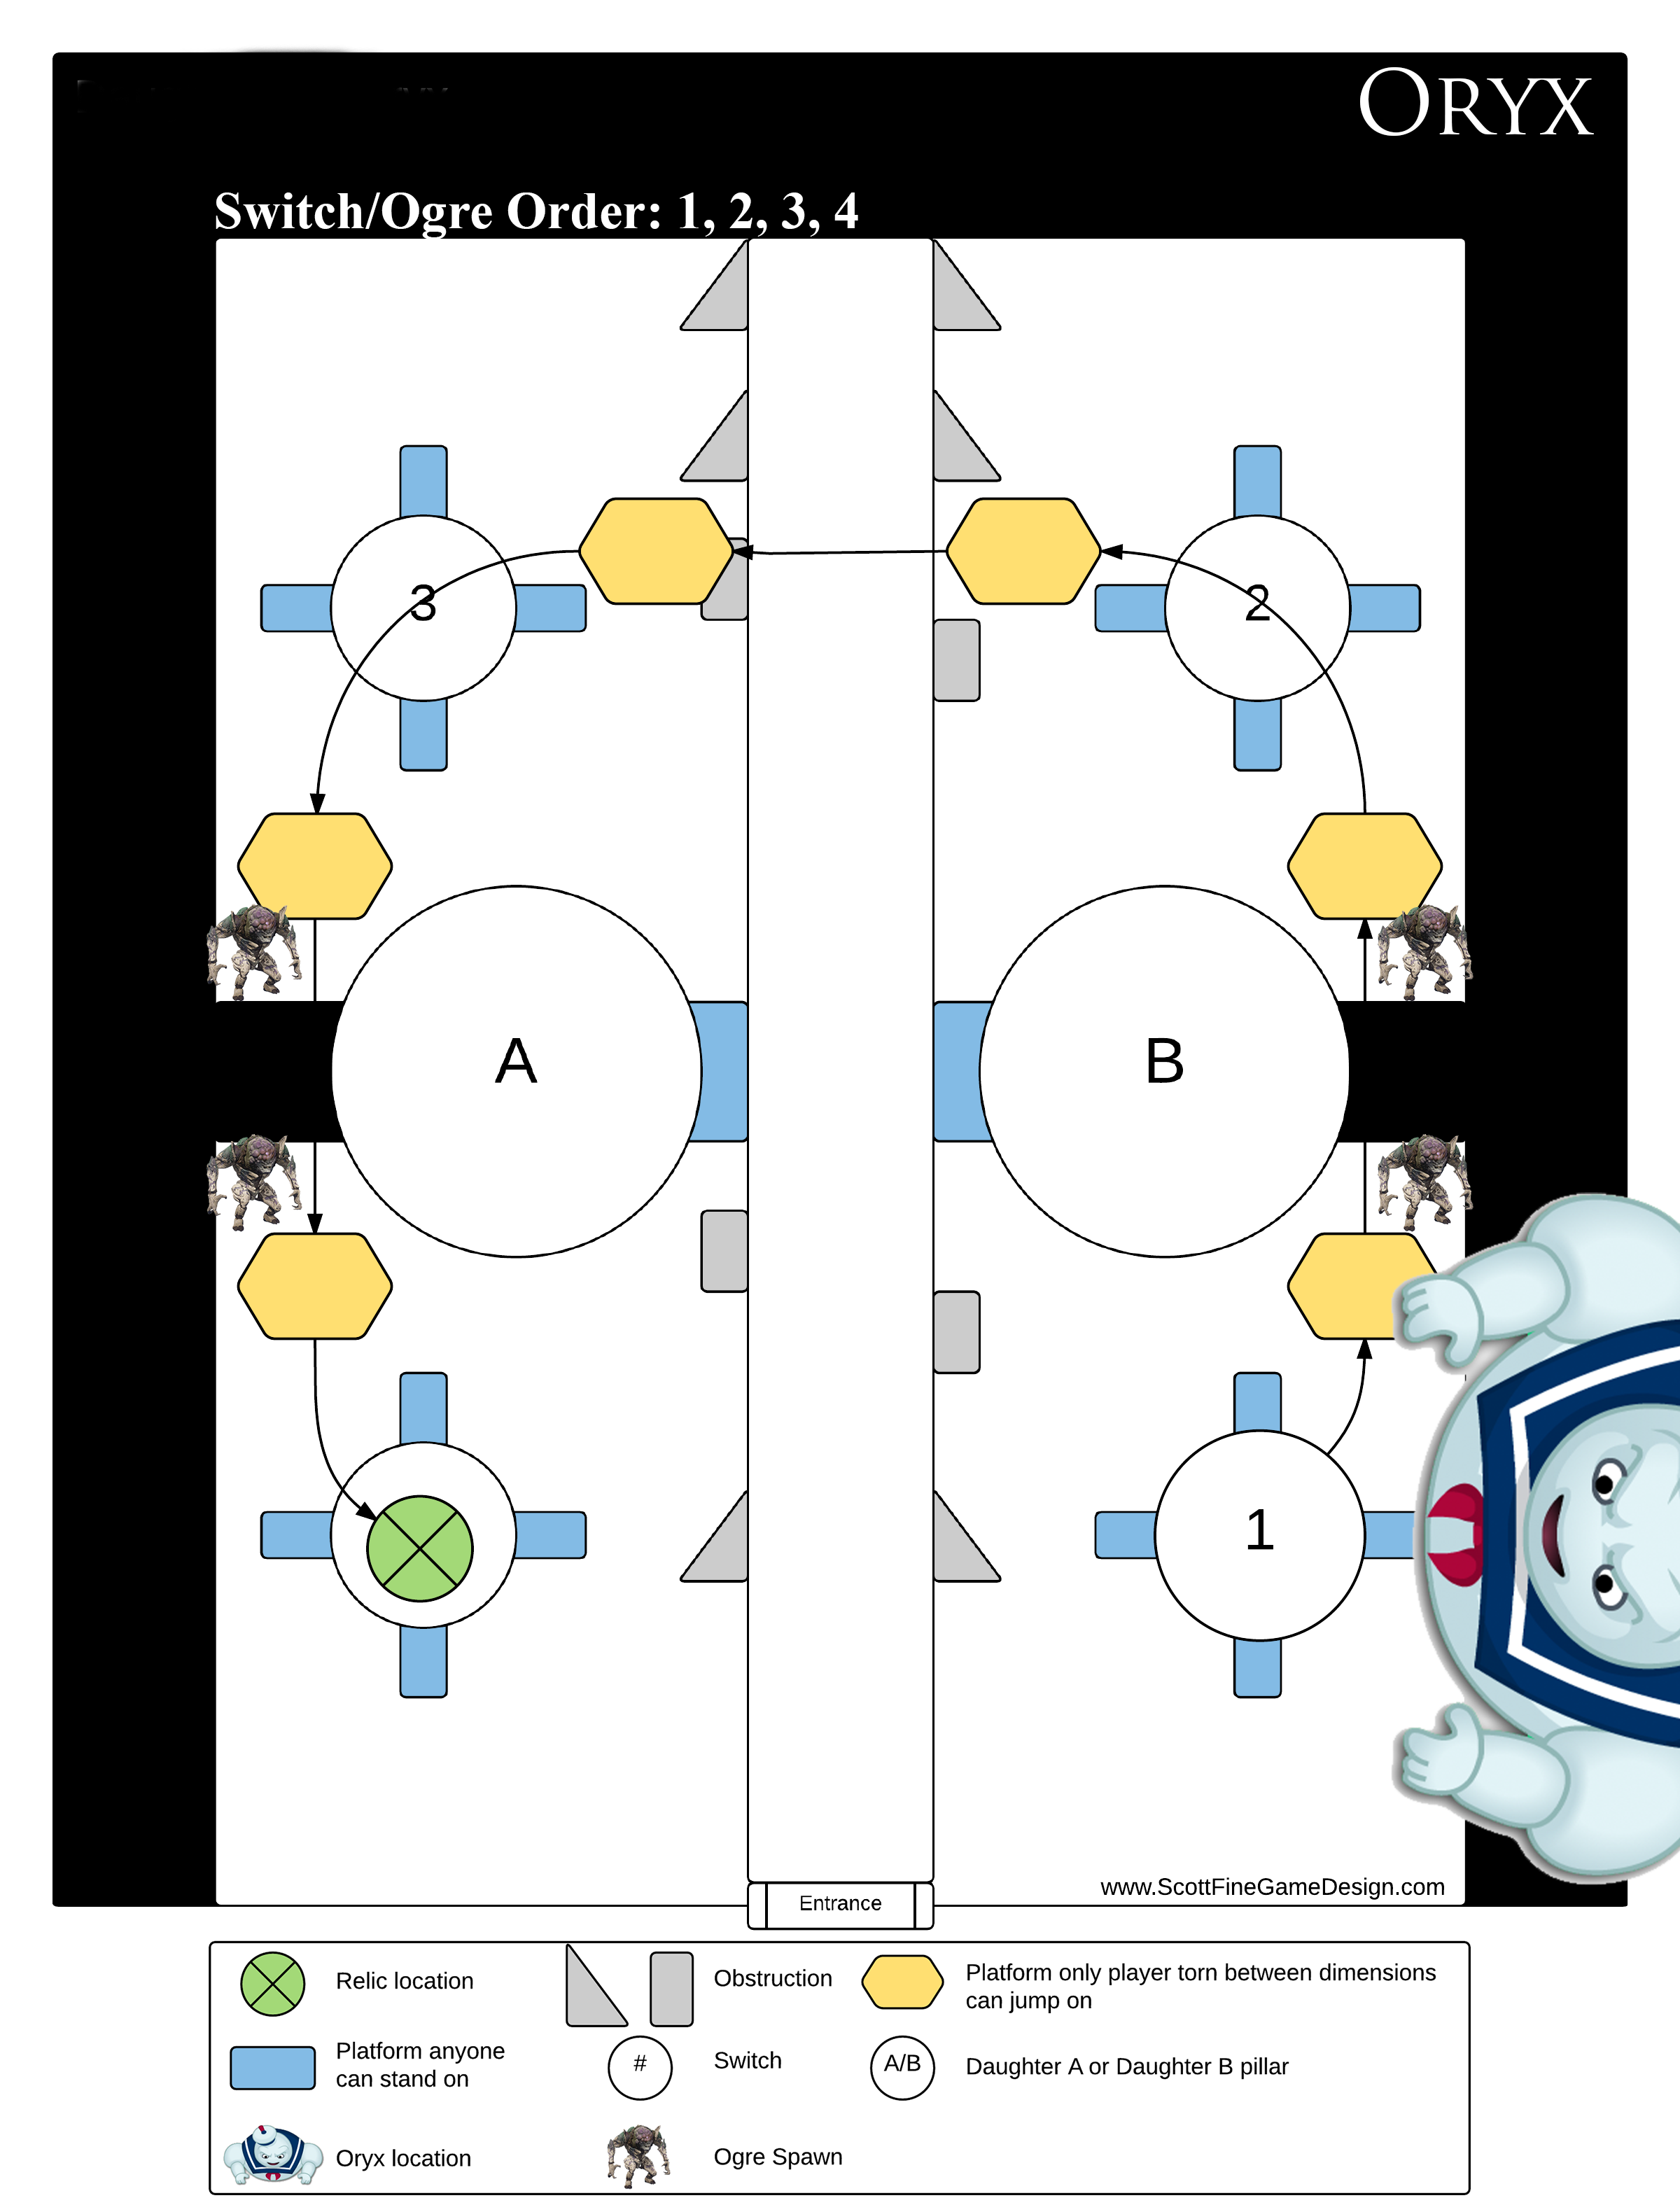
Upon killing both Knights, Oryx will either slide to switch two or three. For the first time he moves, it will be randomly chosen which of the two switches he will move to.

At this point players might not know what to do, but all eyes will be on Oryx.

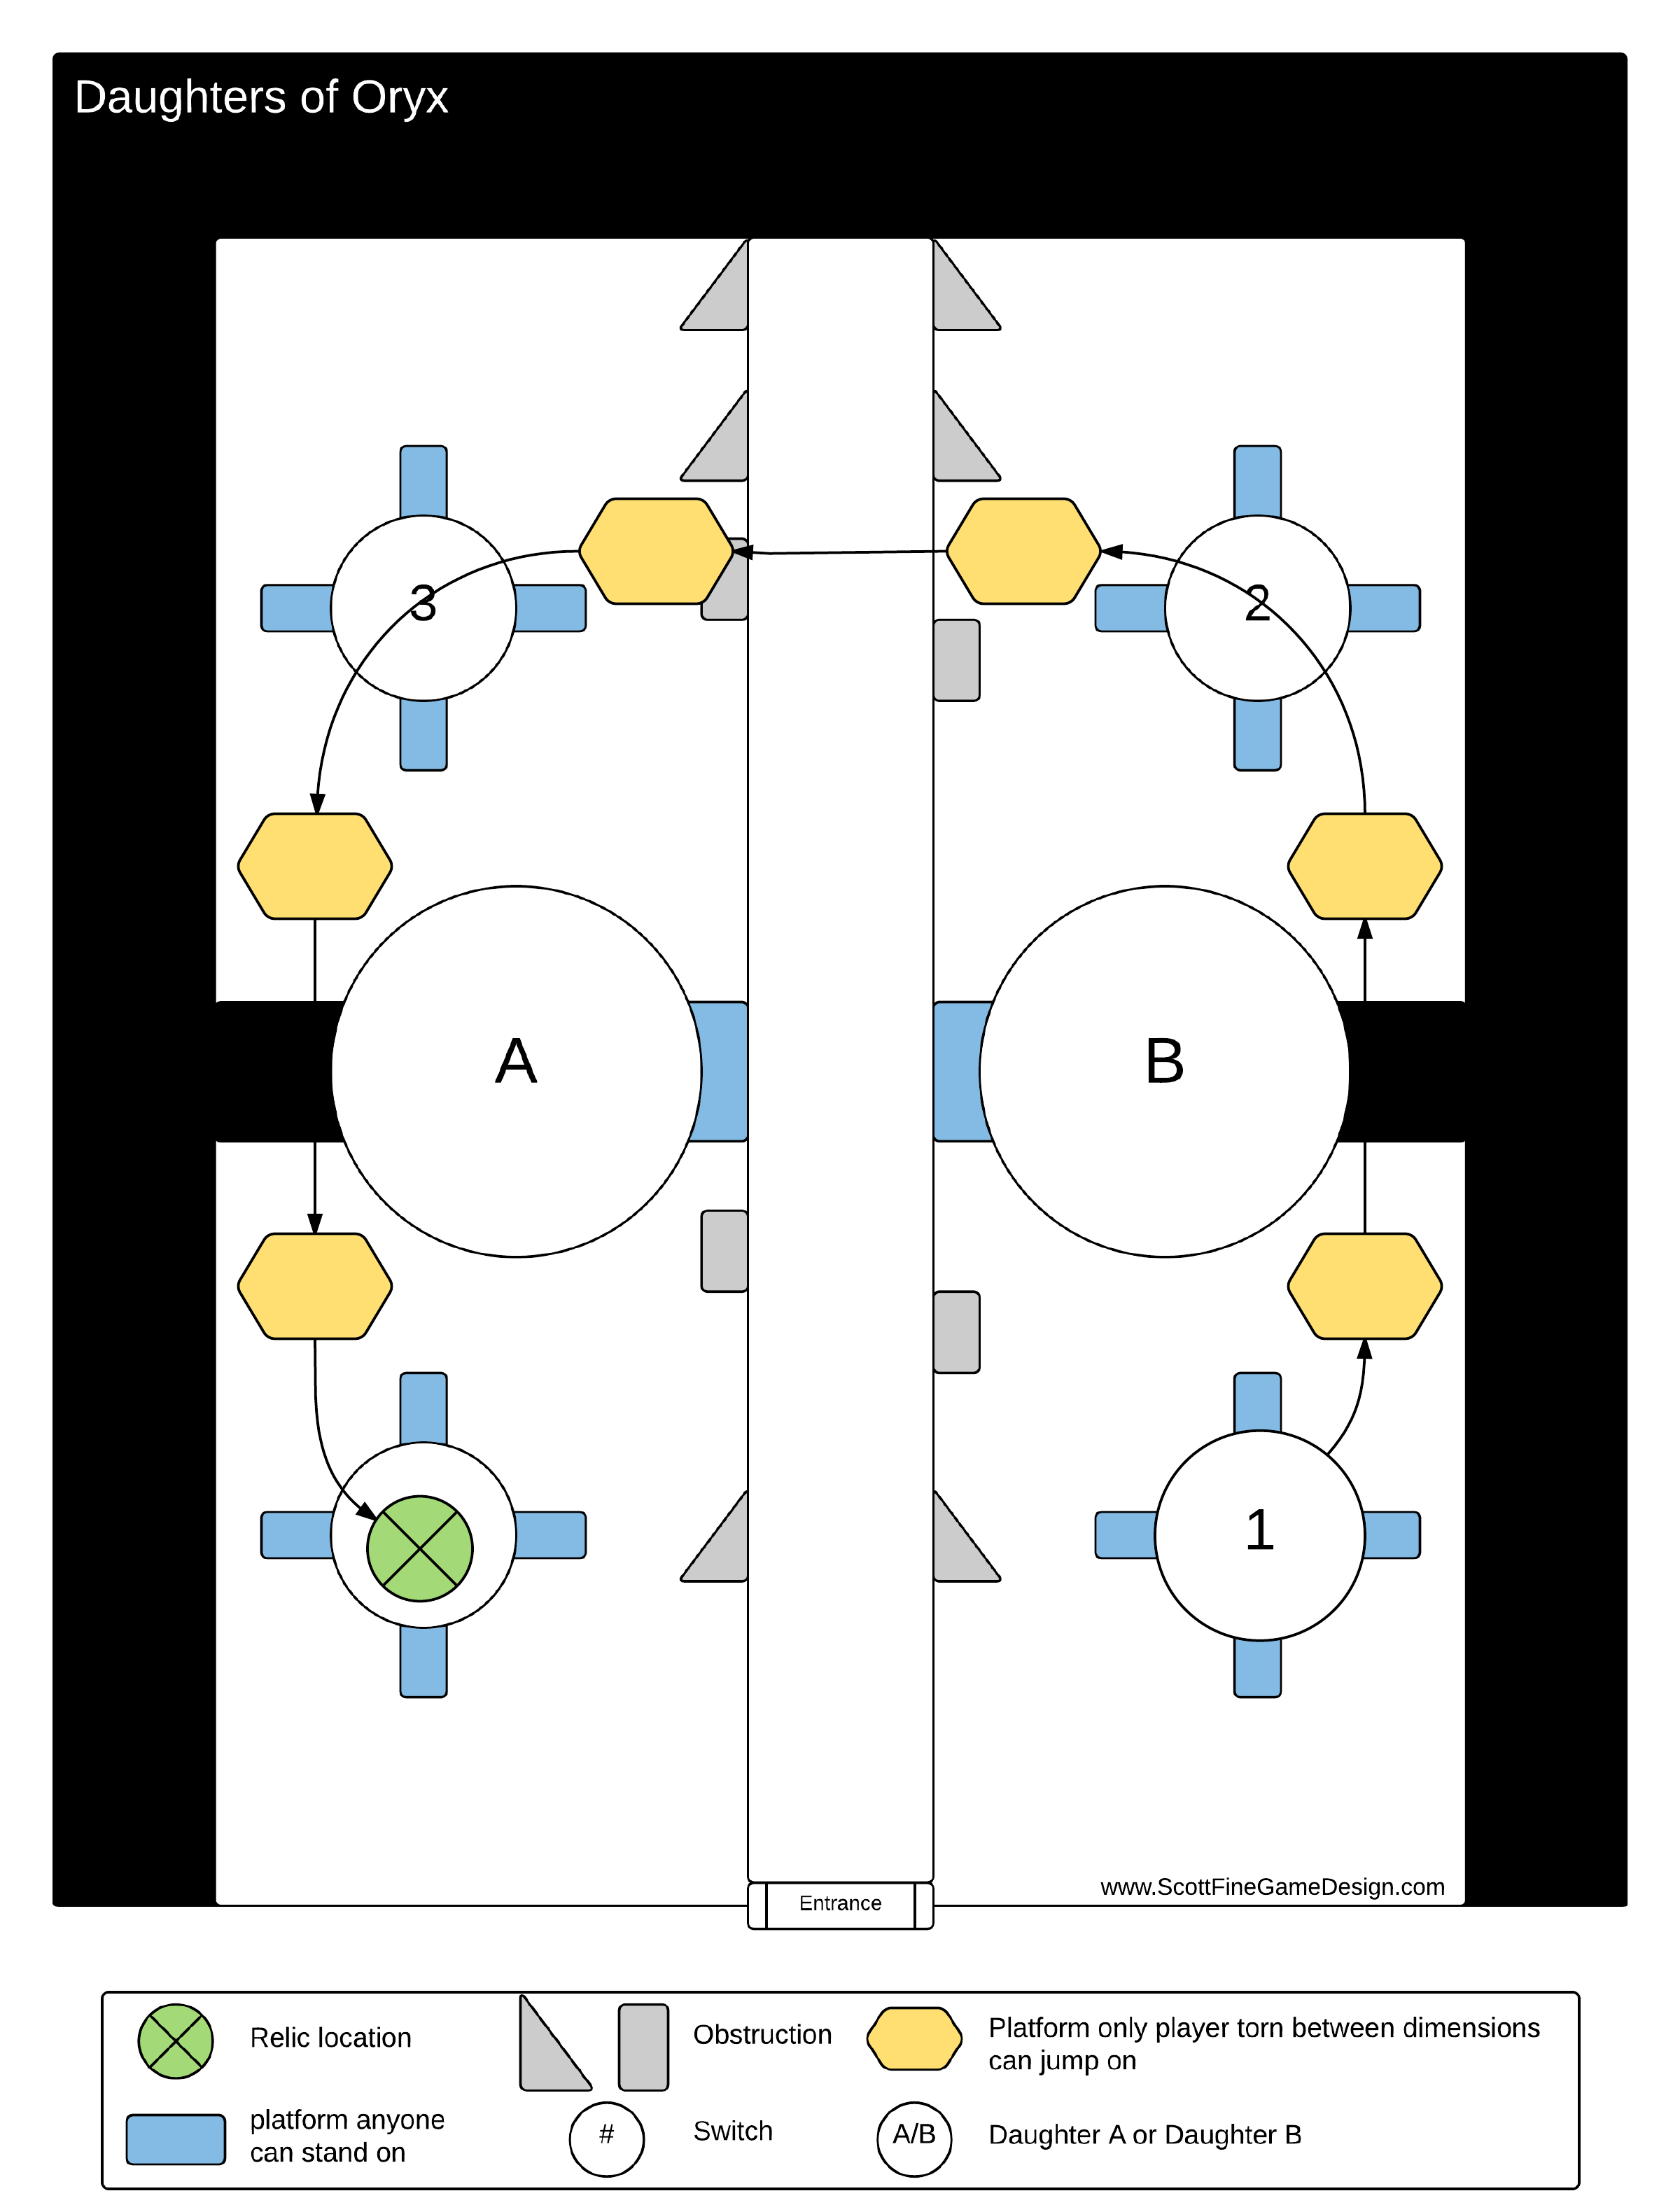
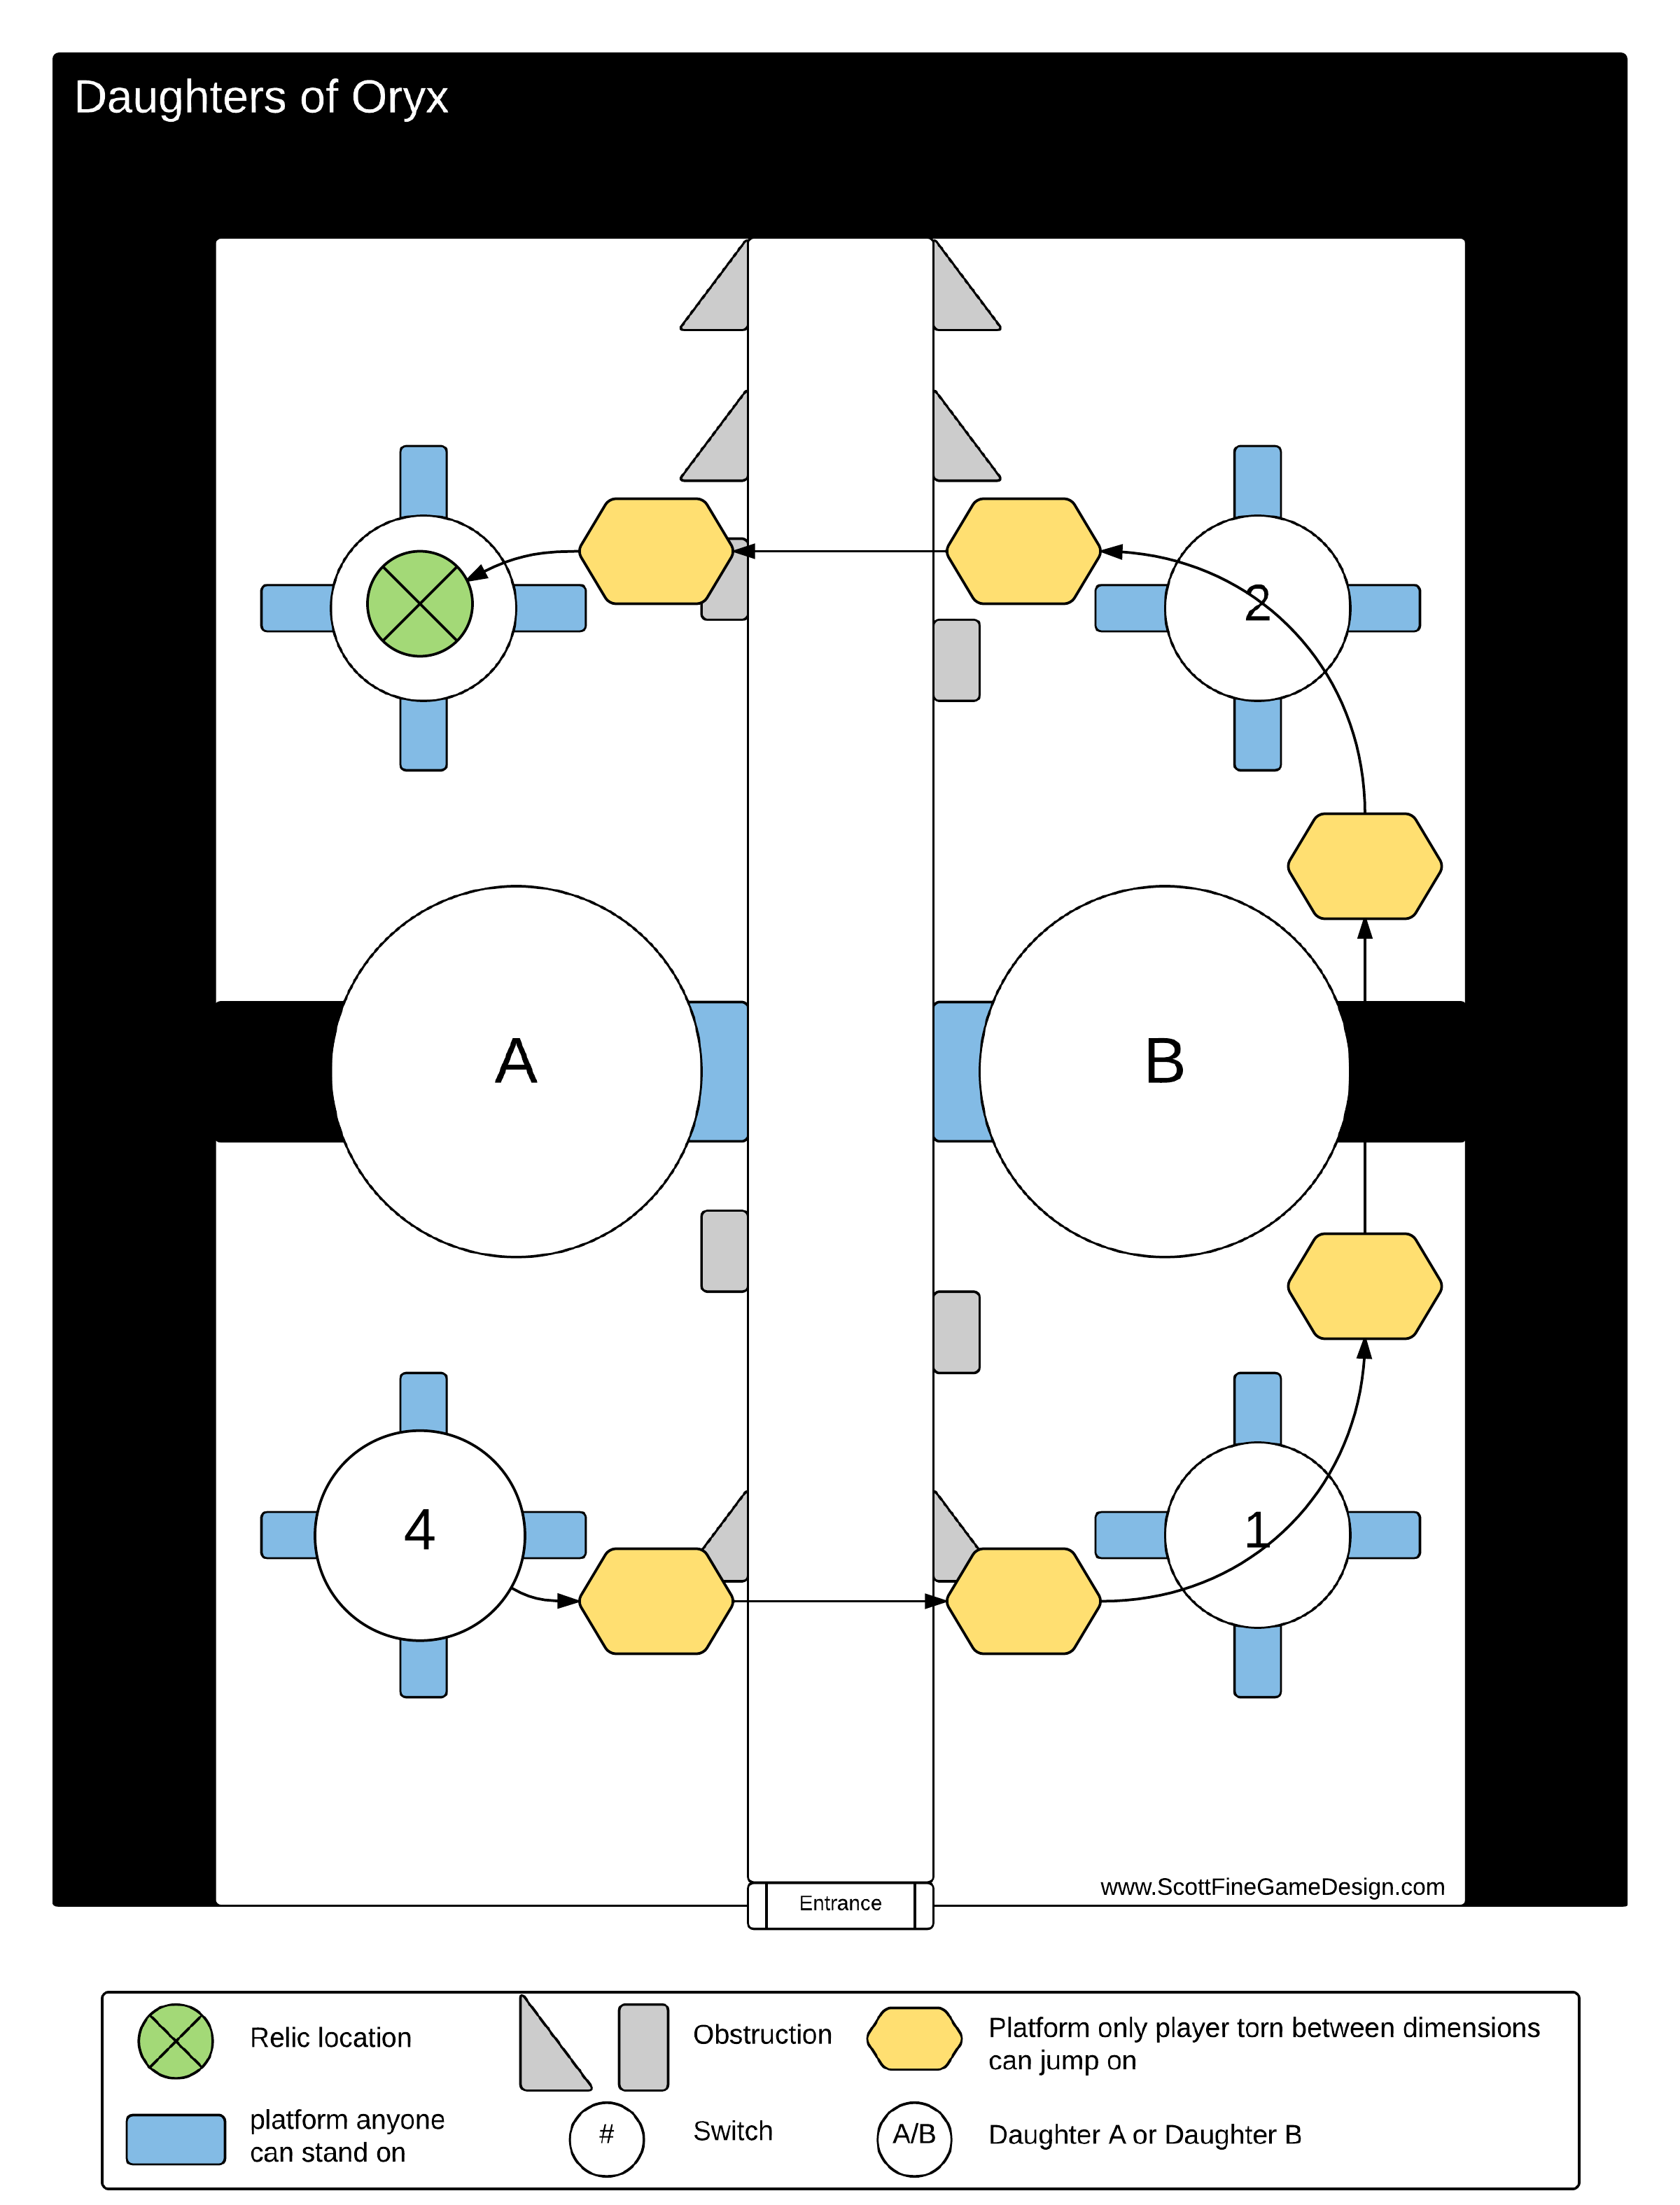
Oryx will then slam the switch he is closest to. Upon raising his had again players will see he has left an orb behind. They will also notice that the icon for the relic is on their HUD again. If they follow that icon they will notice the relic has spawned. The relic always appears above the platform clockwise from Oryx’s location. When a player touches the ball on the switch they will be “Torn Between Dimensions”. Because of the Daughters of Oryx fight, this next part is fairly easy for them to figure out. They need to jump on the plates to get the “Torn Between Dimensions” player to the relic. The order is exactly the same as in the daughters encounter. At this point, the players will jump on their platforms in order and the player who is “Torn Between Dimensions” (We are going to call this player the “Runner” from now on for simplicity) will start their platforming. But something different happens this time.

A “Light Eater Ogre” spawns in the corner next to each switch. While it may seem like it, the ogres spawning isn’t actually attached to when the players activate the switches. Instead, they activate on a timer after Oryx slams the first platform. Their order of spawning additionally helps the players; it is the correct order the players need to activate the switches in.

Side note: Ogres are amongst some of the most feared enemies in Destiny. When one appears, all players have the gut reaction to kill it as fast as possible. This is largely due to the laser blast they produce will make short work of players.

Upon killing these Ogres, they seem to leave a mini blight ball behind.

Side note: This will become sort of a problem later. In the campaign players encounter larger versions of these blight balls. But the larger versions spawn enemies every so often and slow the player when they get near. They can be destroyed if players do enough damage to them. So it isn’t far fetched for players to expect these blight balls to spawn enemies as well.

Roughly about the time the runner collects the relic, they will notice a Tombship and a knight, named the “Vessel of Oryx”, with a shield running down the center of the map. This shield looks strikingly similar to the shield players stole from the daughters. In fact, because of the daughters fight the runner will attempt to steal the shield again.

Once the players have the shield, their gut reaction will be to huddle up inside it and shoot Oryx. This is because that’s exactly what the players did to the daughters. The shield grants them immortality just like the daughters’ shield. There is a good chance they will forget about the “Vessel of Oryx” the first time. Upon firing on Oryx though, they will notice he is not taking any damage. This confuses players because they were able to shoot the sisters immediately after they stole their shield. But it isn’t a big deal, because a few seconds later Oryx will slam his fist on the switch he is closest to and his chest will open up and glow.

In video games, there are not many things more obvious than lit up spots on bosses. It usually signifies a weak point. So the players open fire on his chest. The players will be able to stun Oryx by doing enough damage to his chest. If players don’t do enough, he will clap his hands together and kill everyone.

Upon stunning Oryx though, a fairly large problem rears its ugly head. Oryx does his stun animation, and players will think they need to just keep shooting his chest to do damage. Unfortunately, shooting him doesn’t actually do much damage at all. In order to do major damage to Oryx, players will need to run to the blight balls and detonate them.

This is a fairly large issue. Because the entire game players are taught to destroy and avoid these blight balls. So there isn’t anything in place messaging to the player that they need to stand in the blight ball’s aura.

Side note: This is a tough one. Perhaps displaying something along the lines of “Blight Balls are ready” or even “Enter the darkness…” on screen might help to better message to the players that they need to enter the blight balls. I know they are technically called “Corrupted Light” but they look exactly like miniature versions of the previously introduced blight balls.

Luckily, once a player accidentally enters one of these balls for a few seconds, the players will notice a message “[Player Name] has detonated a Corrupted Light”. In addition to the text, the Corrupted Light will turn white and have particles spinning around it. Hopefully, they activated it at the proper time while Oryx was stunned, or else it wont do any damage. If they don’t have the shield when it is activated, it will kill all the players a few seconds after the message is displayed. This creates another issue with the players learning how to use them, as it would reinforce the need to avoid these balls. If they do have the shield though, everyone inside will survive the blast, teaching the players to head back to the shield as soon as the Corrupted Lights are detonated. Through trial and error, they are able to finally figure out when exactly to detonate the Corrupted Light.

Side note: Remember the “Vessel of Oryx”? In normal mode the Vessel’s sole purpose is to transport the shield to the players. Players do not need to defeat it though it is recommended, as he will attack the players when they are detonating their corrupted light.

Now the players have figured out how to finally do some real damage to Oryx. Everyone is cheering, everyone is excited. That is, until Oryx falls away and reappears in the front of the battlefield, the same place he started the encounter at. As he pushes himself away from the battlefield, players will begin to notice green/white circles appearing around them. The first bomb (depending on the player’s light level) might not kill them, though it will come very close. This likely would panic the players, teaching them to run like mad to escape these explosions. Unfortunately, this can result in some of them getting too close to one another, causing multiple deaths. They will learn to run while staying away from one another. The bombing sequence lasts about 20 seconds in total.

Upon completion of the bombing sequence, Oryx will slide his way to another random switch. This time however, switch one and four are fair game for him to slide to as well. This whole process starts again.

New players will get comfortable with this process fairly quickly. The toughest part is killing the Ogres, but once they figure out their preferred method to defeat them, it seems easy. Then Oryx throws a wrench into the mix.

Once he is at about half health, Oryx wont bomb the players anymore. Instead he will start to remove them from the battlefield one by one. He does this by teleporting players to the “Darkness Dimension”.

The first time he does this, players may not be ready for it and may accidentally touch the giant black ball Oryx spawns on the battlefield. This will instantly kill any players who touch it. This teaches them to stay the hell away from it.

Players still stuck in the main battlefield will be confronted by a Taken Knight on switch two and three. In addition to the two Taken Knights, Thralls will begin to spawn next to switch two and three as well. Except, these Thralls wont focus on killing the players on the battlefield, instead intent upon traveling into the black ball. Players who are communicating will quickly realize that the Taken Thralls who enter the black ball appear in the “Darkness Dimension”. Players on the outside can easily figure out that they need to help their allies by killing as many Thralls as possible.

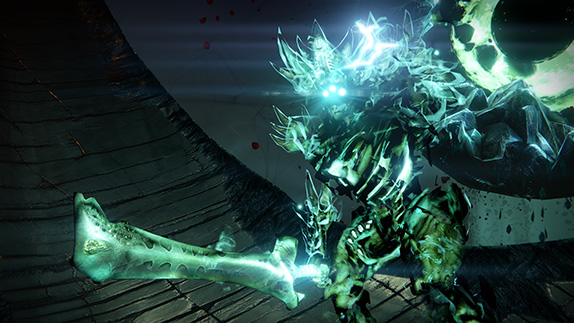
One by one, players will be teleported from the main battlefield into the “Darkness Dimension”. Once inside, they will see a “Shade of Oryx” warping around the outskirts of the “Darkness Dimension”. This is a very familiar fight to players who have played the campaign. One of the final missions of the campaign, “Regicide”, involves the players fighting Oryx (at his normal size) in the “Darkness Dimension”. Players inside the “Darkness Dimension” will have no trouble figuring out that they need to kill the shade as quickly as possible. Initially there is nothing else to shoot at or draw the player’s attention, a good thing as the shade is a little difficult to see.

Side note: This fight can be a little confusing though. Because in “Regicide” we are taught that while Oryx is on the Outskirts of the “Darkness Dimension” we cannot do damage to him. But here in the raid players can, and should, damage the shade while he is on the outskirts of the level.

Every so often the Shade will travel towards the players with it’s sword raised, ready to attack.

Because of the “Regicide” mission, players know to avoid this attack as it can be devastating. Players will continue to damage to the shade until it is dead or the final player is teleported into the “Darkness Dimension”. Upon the final player being teleported in, the players will have only a few more seconds to kill the Shade before they themselves are all killed. Upon killing the shade, the “Darkness Dimension” will dissolve, and the players who were inside it will find themselves where the black ball in front of Oryx used to be.

Upon completing the “Darkness Dimension” section of the raid, the players have experienced and figured out every different challenge Oryx has to offer. Oryx will shift to stand in front of a switch again, and the players will know what to do from there.

Once the final Corrupted Light detonates and Oryx’s health seems to be empty, players will celebrate. They will soon find out that celebration was in vain when he reappears in the front section where he initially spawned.

Hopefully at this point the players will not run away and have their special and heavy weapons reloaded. Because Oryx will rise up and attempt to do his clap attack one more time which will result in killing all the players. Thankfully, by this point all the players should be familiar with this animation and see it coming from a mile away. His chest will open up as he prepares to kill the players. If they can deal enough damage to him, they will win. If not, he will kill them all and they will have to start the encounter over again.

The final section of this post, “How to put the pieces together”, I am going to do in a brief step-by-step format. I feel as if this would be easiest for me to explain without having this post drag on for 50 pages.

How to put the pieces together:

Steps:

1.     Approach the floating orb near the edge of the level. Oryx will spawn at the edge.

2.     Kill Taken Thralls which Oryx spawns, followed by killing two knights on platforms two and three.

3.     Oryx moves to a switch.

4.     Oryx slams the switch in front of him with his fist. This spawns an orb which will turn the player who touches it to “Torn Between Dimensions”

5.     Player who is the chosen runner will collect the orb and begin making their way around the “Torn Between Dimensions” platforms.

6.     The players who have switches assigned to them will have to jump on their switches in counterclockwise order to spawn the “Torn Between Dimensions” platforms.

7.     Upon activating a switch, a “Light Eater Ogre” will spawn next to each switch in the order they were activated.

8.     The players, while remaining on their switches, must kill all the Ogres as quickly as possible. The sixth player can move around the center and shoot Ogres to help kill them.

9.     Where the Ogres die, a Corrupted Light will spawn. All players must avoid the Corrupted Light at this time.

10.  Once the runner has collected the relic, they must travel to the edge of the map where Oryx initially spawned. Here they will see a knight named “Vessel of Oryx”. They will need to slam the relic into the knight to steal his shield. The runner will then need to kill the “Vessel of Oryx” and make their way to the center of the map between the two giant pillars which the sisters were on.

11.  Upon the runner collecting the relic all players need to get off their switches, finish off any remaining ogres, make their way to the center to help kill the “Vessel of Oryx”, and enter the shield.

12.  If the players did steps 2-11 fast enough, they will have time to see Oryx slam the platform he initially slammed during this cycle, and then “Call upon the darkness”. While he is calling upon the darkness, his chest will open and light up. All players will need to shoot him in the chest. If they do enough damage to him they will stun him. If not, he will kill them all when he claps.

13.  Once he is stunned, the players will need to run to the blight balls closest to their switch (Where the ogre which spawned next to their platform died). They must sit in the ball until the screen says “[Player Name] has detonated corrupted light”. Once that text appears on screen they must run back into the shield held by the runner.

14.  This will cause massive damage to Oryx. The more balls detonated the more damage will be done to Oryx.

15.  If Oryx still has any health left, go to #16. If his health seems to be empty go to #20

16.  Players need to pay attention to Oryx when he comes back up in the spot he initially spawned. If he summons a black ball in front of him skip to #18. If he pushes away from the battlefield, then he is going to bomb the players. The four players who had switches need to run in circles around their switch. The other two players need to run in circles at either side of the battlefield (One near where Oryx initially spawned, the other near the entrance)

17.  Once Oryx is done bombing the battlefield, go back to step 2.

18.  The black ball is summoned. Oryx is going to teleport players one by one to another dimension. Players who have yet to be teleported will need to kill the two Taken Knights which spawn on switches two and three. They will then need to kill Taken Thralls which spawn nearby switches two and three. If the thralls are not killed, they will enter the black ball and attack the players who have been teleported.

19.  Once a player is teleported they must kill the “Shade of Oryx” inside the “Darkness Dimension” as quickly as possible. The Shade will warp around the outside of the “Darkness Dimension”. Every once in a while he will light up and raise his sword, slowly moving towards a player. He will then slam his sword down and attempt to kill the player. Once the last living player has been teleported to the “Darkness Dimension”, they will only have a few more seconds to finish off the “Shade of Oryx” or all players will be killed. Upon killing the Shade of Oryx, the players will be brought back to the battlefield. Go to step 2.

20.  RELOAD ALL YOUR GUNS! Oryx is going to spawn in the front of the battlefield where he first spawned at the beginning of the encounter. His chest is going to open up again, so all players must unload all their best weapons on him here. If the players do not do enough damage, he will clap and kill everyone. If the players do enough damage, he will die and the players will have won.
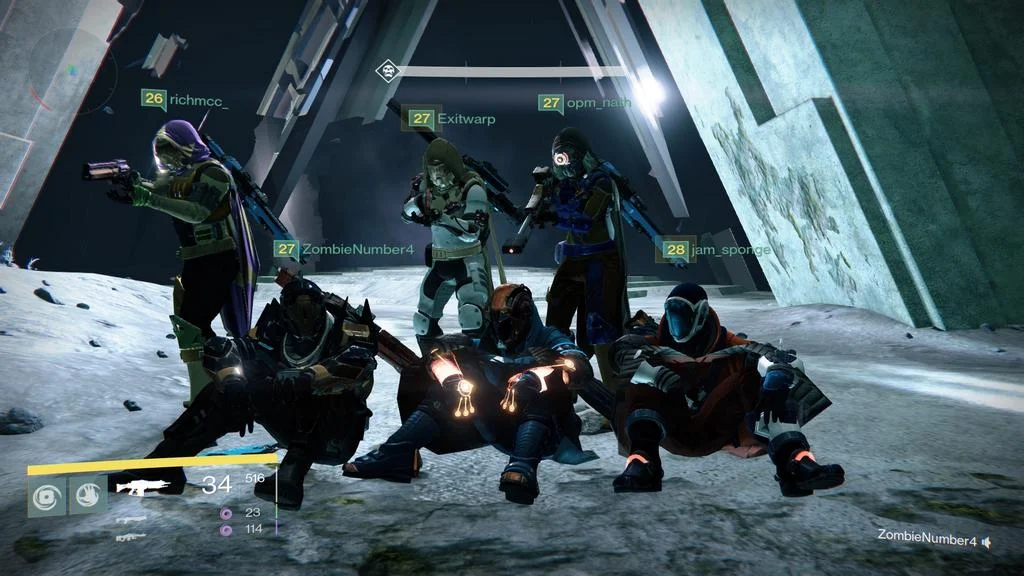
21.  Dance!

With the right team, this is easily the most rewarding section of the raid. It forces every player to be at the top of their game, works as an excellent team building exercise, and also builds on previous encounters. While it is not perfect (The corrupted light issue being the biggest problem I see with it), I still find it to be the most rewarding experience in Destiny.

This concludes my three-part look into the King’s Fall Raid in Destiny. If you enjoyed this series, please let me know. If you didn’t, please let me know what I could do to improve. I enjoyed doing the research and analyzing this raid, and would be more than happy to go into detail about the other parts if there is a demand for it. I could probably talk about it all day and not get tired of it. I would like to thank KaliksHD for his high definition videos. I would not have been able to create this post without them. (More of his work can be seen here: https://www.youtube.com/channel/UCLM1eE8w_DZ89n4yIxVbffA ) The images I used from his videos are the ones which have no watermark. I would also like to thank Briar Rabbit for his videos from a different angle. (More of his work can be seen here: https://www.youtube.com/channel/UC02QCCz8STKVGEDS4VCsL4g ) The images I used from his videos have his watermark in the bottom right corner. And finally, last but not least, I would like to thank you, the reader. I hope you enjoyed reading this post as much as I did writing it. If you have stuck with me through this entire series, I would like to give a huge thank you for giving me your time. I really hope we can all create better games by looking at some excellent ones.

Next week we will be either looking into Angry Birds 2 or the difference between King’s Fall hard and normal mode. I haven’t quite decided yet and both ideas excite me. When we get to Angry Birds 2, we will also begin to think about how it makes the player feel in the moment to moment gameplay. And I don’t mean just making the player feel smart.

I’ll see you guys next week,


Scott

 If you like my work and want to support my caffeine addiction, please consider donating to my Ko-Fi.

In-depth look at - Objective: Defeat the Daughters of Oryx

Welcome to part 2 of my look into the King’s Fall Raid - normal. Again, I have broken up this post into two parts, because it is going to be longer than my normal posts. The first part will discuss the process of players figuring out how to defeat these bosses. The second part will put the pieces together and go over exactly how to defeat them.

If you haven't read part 1 (Power the Glyph) yet, I recommend checking it out HERE!

**If you have yet to finish the raid and wish to go in blind I recommend you stop reading now. Otherwise please enjoy. **

The sisters fight I would argue is tougher and easier than the final Oryx fight. It is tougher because the players cannot choose who gets to be “Torn Between Dimensions”. Resulting in potentially disastrous results if the runner is not fantastic at platforming. It’s easier though because it is less complicated and considerably shorter than the final fight. But I’m getting a little ahead of myself.

Side note: Before we get started I wanted to let you know that you will see some images with yellow numbers on them. I created a map which can be seen towards the end of the post. To better get your bearings around the room I labeled everything in the room as I did in the map. So when you see a number you will know it corresponds to a location on the map.

Process of players figuring out each of the pieces:

When the players enter the room this is what they first see:

Right from the get go they notice the two creatures in the domes. Because these two creatures are the only things moving in the room they draw the player’s attention. Upon close examination the players will notice that these two are enemies. How might they know this? They have health bars. Everything thus far with a health bar has been an enemy. So a player may try to shoot them. They will get the message, “Immune!”.  It is not a far stretch for the players to figure out that these two are shielded. At this point players may try to enter the shield. This kills them instantly and teaches them to stay away from these two. (This will become a problem later) Upon further inspecting the rooms players will notice switches like this one and one of the players will become “Torn Between Dimensions” (At this time the players may not be aware that these are switches):

From the player who is “Torn Between Dimensions’” perspective their vision looks like this:

You will be seeing that circle inside the diamond on most of the screen shots because it is really important.

They will also notice a floating ball in the sky. Now it must be important because regardless of where the player looks there is a marker on their HUD telling them exactly where it is in relation to them. It is fairly safe to say that players will know they need to retrieve this floating ball (more commonly called the relic) because of their HUD constantly reminding them about where it is. The players then will explore and discover a switch. Upon jumping on it, the switch will light up and “Hymn of Weaving” will begin to count down. (More on “Hymn of Weaving” later)

If they stood on the correct first switch, platforms which match the strange transparent look of the player who is “Torn Between Dimensions” appear. They have a little ball similar to the look of the relic on them as well.

If they did not stand on the correct first switch, then upon leaving the switch, it will still say “Platforms fade from existence”. This will make them wonder, “what platforms?”, as no platforms spawn if the players stand on the wrong switch. Thus, they will try different switches  to see if any platforms actually appear.

The platforms look like this:

At this point, players may try to jump off their switch to jump on the platform. If they leave the switch, the platforms disappear and the text “Platforms fade from existence” appears on screen. This teaches the players that they will have to stand on the switches and not leave them if they wish the platforms to stay. So they will go back and stay on the switches.

Through trial and error, different players will try to jump on switches and platforms. Most of the time they will fall through the platforms. This is because only the player who is “Torn Between Dimensions” can travel on these platforms. Unfortunately, the platforms only appear when the switches are activated in the correct order. Eventually, players will realize that when they jump on the switches in the correct order, the “Torn Between Dimensions” platforms will spawn. The ball visual aid on each of the platforms helps players to figure out this puzzle by getting the players’ attention.

Once the players have figured out how to activate the switches in the correct order and retrieve the relic, they will need to figure out what to do with it next.

So here is the tricky part. The player who is holding the relic must take the relic to the daughter who is not burning red and slam it into her, stealing her shield. This will allow all the players to do damage to her. The issue here is if you remember earlier when the players attempted to enter the shield they were instantly killed. So they will not be thinking that they need to take the relic to them. Because they think they will die if they do.

Side note: Perhaps giving the relic holder a slight tint on their character that could match the color of the shield they need to steal might help to message this better. Or having the invisible platforms lead to the daughter they need to steal the shield from. Or better yet the symbol that appears on the HUD to show the players the location of the relic could be moved to appear over the daughter they need to steal the shield from. This would message to the player to do something to that daughter.

Once the shield is stolen, it will follow the relic holder (The player who was “Torn between Dimensions”). While the relic holder is running around, they will be shot at by the daughter who they stole the shield from and other enemies which spawn. They will notice that they are taking no damage. This teaches the player that they are invincible while they are in the shield.

Remember “Hymn of Weaving”? Well, that timer has been counting down this entire time. It is more than likely that by this point players have learned that when the timer runs out they will all be killed. This is because it took them some time to figure out the platforms. When it runs out this time, all the players outside the shield will die. This teaches the players that being in the shield will keep them from being killed by the “Hymn of Weaving”. Because of the players’ previous experience with the shield in the Objective: Power the Glyph section, they will be able to make the connection that more than just the relic holder can make use of the invulnerability perk.

After repeating this process, they will be able to kill the first daughter. Upon doing so though makes the second daughter more powerful and harder to kill. The issue here is that there is little messaging telling the players this. Players learn this by the lesser amount of damage they are able to inflict on the second sister compared to the first. Perhaps if the second daughter changed color, had a different animation, or even the text “Daughter B has absorbed daughter A’s power” on screen would help the players to know better. Because if the players only weaken daughter A and not kill her, then daughter B will be just as easy to kill.

Side note: I wonder if the hint Bungie tried to use to show that a certain daughter is more powerful is the one where they are burning red. If so, this could be better. Because the burning red combined with the casting spell animation simply says to me, “I am casting the spell,” or maybe “I do additional damage,” or something like that. Something like an additional shield might message it better. Or maybe a sheen that covers the daughter.

Putting the pieces together and how to beat it:

Like in the Objective: Power the Glyph, once the players figure out how to beat them, they are fairly easy. At least, if no one makes any mistakes. Upon entering the room, a player will be “Torn Between Dimensions” and a relic will spawn.

Four players who are not “Torn Between Dimensions” but have switches:

Four players who are not “Torn Between Dimensions” will be assigned to a switch. Each player will need to jump on their switch in a counterclockwise order, starting with the switch counterclockwise to the relic. This will begin the countdown. During this time, they will need to kill enemies which spawn across the room while they remain on their switches. At “Hymn of Weaving 0:40”, an enemy sniper will spawn in the black area (reference the map in the next section) immediately next to each switch. The players on the platforms will need to kill these snipers immediately or they will kill the players. When the runner has collected the relic, the players can leave their switches and run together to a location where they can easily shoot at daughter A whose shield was stolen.

For anyone who is still having trouble understanding what the players need to do, I have created these maps to help you out:

Map made in Lucidchart

To further assist with your bearings, here is an image of the room from the entrance with everything labeled:

Player who is not “Torn Between Dimensions” and does not have a switch assigned to them a.k.a. “The Floater”

There are four players for the four switches and another player who is “Torn Between Dimensions”. This leaves one more player in the raid fireteam. This sixth player will have the most straightforward job: Kill everything. This player will run up and down the center of the map killing every enemy who gets in their way. This is so the enemies who are spawning don’t overwhelm the players on the switches. When the player who is “Torn Between Dimensions” retrieves the relic, this player will join the others in the group shooting the chosen sister.

Player who is “Torn Between Dimensions” a.k.a “The Runner”:

This player must jump on the platforms, starting from the switch which was first activated to retrieve the relic. It is important that they collect all of the balls from the “Torn Between Dimensions” platforms, or they will not be able to collect the relic upon reaching it. Once the relic is collected, they will need to travel into the shield of the daughter who is not casting the spell and steal it from her. They will then need to travel to the other players who are grouped tightly together and make sure all the players are in the shield. They can help to shoot the daughter or they can kill enemies in the area.

Upon the “Hymn of Weaving” timer running out, the shield will be returned to the sister it was stolen from. A new player will be “Torn Between Dimensions” and the relic will spawn high above a random platform. The player who previously was the runner will need to switch jobs with the player who is now torn. If the player now “Torn Between Dimensions” had a switch, then the player who was previously torn will take over for that switch. If they were the floater, then they will do the floater’s job. The whole process will need to be repeated again, except this time they will steal the shield from and kill daughter B. Doing so will reset the relic and a new player will be “Torn Between Dimensions”. The players must repeat this process one more time and finish off the weakened daughter A.

While I enjoy this section of the raid, it can be particularly frustrating when one of the players cannot platform for the life of them. From a design perspective though, I really like how the player who is “Torn Between Dimensions” is random every time. This gives most players a chance to try the platforming sections out. Everyone getting a chance to try it out is very important for the final fight against Oryx.

Honestly, I feel like some messaging in this encounter could be better. After the player collects the relic, there isn’t anything to suggest they should try to steal the daughter’s shield. And even then, which one?

Next week I will continue my look into the King’s Fall Raid, when we look at the final encounter. Finally, we get to see Oryx, and analyze the design of the final encounter. I would like to thank Spo0ox for his high definition videos. The screen shots are all from his videos. I would not have been able to put this together without his videos. (More of his work can be seen here: https://www.youtube.com/channel/UCIu1Gjh28GRmQz1DY10eZ3g ) And I would like to thank you, the reader, as well. I hope you are as fascinated as I am by this excellent raid.

I’ll see you guys next week,

Scott

If you like my work and want to support my caffeine addiction, please consider donating to my Ko-Fi.

Check out Part 3 where we take a look at defeating Oryx HERE!

An In-depth look at King's Fall - Objective: Power the Glyph

As I mentioned before I am going to do a series on the King’s Fall Raid - normal, in Destiny. While I was going to do the entire raid, it is fairly large. So I think I will stick to a few encounters which I believe are particularly challenging and really force the players to work together. I have broken this post up into two parts, because it is really long. The first part talks about the process of players figuring out how to complete this section. The second part talks about how they complete it once they have figured out exactly what to do.

**If you have yet to finish the raid and wish to go in blind I recommend you stop reading now. Otherwise please enjoy. **

The first real challenging part of the raid (the first part where a couple people making a mistake forces the entire team to start this section over from the beginning) is the room before the Warpriest boss.

Process of players figuring out each of the pieces:

In this room payers are tasked with finding a way to open this portal:

Notice: The portal and the runes outlining the doorway. Also notice the plate in front of the portal.

As the players explore the area they notice a room on the right side:

Notice: The black/transparent orb on in front of the player.

And a room on the left side:

If you look at the image of the right room, you can see a black/transparent orb in front of the player. Upon a player touching the orb, shooting, or attacking the Acolytes in the center room, the sequence begins. The players are made aware of the sequence beginning by the Acolytes rising to attack them and the text “The Annihilator Totems awaken”. In addition, the Annihilator Totems begin to burn red.

Sidebar: The last time players saw Annihilator Totems in action was in the Crota's End raid. Which is a lower level raid. So most who have come into this raid know they need to remain standing on the totems to keep from the players being wiped out.

Upon realizing this, players will run to the totems and attempt to keep them from killing everyone. Two things happen to players when they enter either of the side rooms. Either they completely miss picking up the orb and their health begins to drop. (Signaling to the player that they did something wrong and might want to go back to the center) Or they collect the orb and get the “Brand of Unraveler” (for the left room orb) or the “Brand of the Weaver” (for the right room orb). Players are made aware of this by the following feedback: Text on the screen saying “Brand of the Weaver 0:30”, a shield appears around them and their health no longer drops while they are in the room.

Here we can see the text “Brand of the Weaver” with its timer, the distortion from the shield and the player is in the room without taking damage.

This messaging helps players to figure out, “okay so I need this shield to go into the room and secure the Annihilator Totem.” Once they realize they can stand there without dying two more things happen. First, another player might try to stand in the shield as well. This is because there are multiple shields throughout the game (Like the titan defender class or the Relic shield in the Vault of Glass Raid) which multiple players can take advantage of the benefits. So they might try it. The other is that the “Brand of the Weaver” timer will run out.

When the timer runs out the player holding the shield loses it. “Brand of the Weaver” is replaced by “Deathsinger’s Power x10”. At this point if the player is alone on the Annihilator Totem, they will begin to lose health. Any player’s gut reaction at beginning to die is, “I need to get the hell out of here.” Unfortunately, they can’t leave the Annihilator Totem or the entire team wipes. They will call someone else over to try and take their spot for them on the totem while they get the heck out of there. If the new player who is heading over to the totem is paying attention, they may notice the black Orb respawning. Typically, then they attempt to grab it and go to the Annihilator Totem. If they get there before the player with “Deathsinger’s Power x10” dies, then the player with Deathsinger’s Power will notice they are no longer taking damage while in the shield. So, if the players don’t already know that more than one of them can be in the shield at once, they will now.

Side note: If they don’t make it there in time, then the player with Deathsinger’s Power will die and lose Deathsinger’s Power. Often times the second player will die not long after because it takes 30 seconds for a player to be available to be revived again, and the shield only lasts 30 seconds. As you can see, if the player dies right after the second player grabs the shield, they are not going to get revived in time. Resulting in eventually everyone dying.

If a player chose to save their own skin and try to get back to the center where they wont be killed, the Annihilator Totems will activate after a time and kill everyone. But, if someone can make it over there to stop the Annihilator Totem from wiping everyone out, then the player with Deathsinger’s Power will have a few seconds to experiment. When the player with Deathsinger’s Power accidentally or intentionally reaches the center plate they begin to get feedback. The plate lights up, “Deathsinger’s Power x10” begins to go count down, and the runes on the sides of the portal begin to glow.

Side note: The runes give players feedback on how far they are to completing this section. When the player brings the Deathsinger’s Power to the center plate, the Deathsinger’s Power number counts down slowly. While this is happening, runes are beginning to light up starting from the bottom runes on the portal doorway. Once all the runes are fully lit, the players can progress to the next challenge.

Though I admire this section of the raid because of the amount of teamwork and communication it promotes, it is not perfect. In order to actually win the, players need to figure out that they can pass the shield between each other. This is done by both players being inside the shield at the end of the “Brand of the Weaver” countdown. The messaging here is not as clear cut as in the rest of this section because the player who is in the shield with the player who is holding the shield has “Aura of the Weaver” displayed. While this is excellent messaging that the player is inside the shield, it doesn’t help them understand that anything is going to happen when the player holding the shield’s countdown ends. So this part really just comes down to trial and error and hoping the players can figure it out.

Side note: Perhaps making it say “Aura of the Weaver transfer 0:30” and having it count down as well would make it more clear as to what the players need to do.

Putting the pieces together and how to beat it:

Once the players have figured all this out it gets considerably easier. Players will need to split into two teams of three. One for right side one for left side. (For the rest of this explanation I’m going to talk about only one side to keep from confusing readers. I am doing this because both sides need to do the exact same thing.) Of the team of three, one player will stay in the middle to kill enemies who spawn out of the portal and surrounding doors. If left unchecked the enemies from the portal will rush the players on the totems. The Wizards which spawn from the doors will attempt to kill the players in the center room exclusively.

The other two will run to the Annihilator Totem collecting the black orb along the way. These two players will have to kill enemies and remain on the Annihilator Totem.

They must do this while both are also in the shield or the shield will not pass to the next player. When the “Brand of the Weaver” timer runs out the the shield will be passed to the player who was not holding it. It will begin to count down and a boomer will spawn on a ledge far above the players. They will have to kill this boomer. The player who was holding the shield needs to tell the player who was in the center room to switch. Upon doing so both players switch places.

So the player who was holding the shield now will be in the center room killing enemies while standing on the plate to charge the door and remove their “Deathsinger’s Power”. The player who was standing at the totem but not holding the shield now is the shield holder and must remain on the totem until they pass the shield. The player who started in the center is now standing inside the shield, at the totem, killing enemies and preparing to have the shield passed to them. This process is repeated 10 times until the Warpriest deems the players worthy and the portal opens.

A visual map I put together of what the area looks like: The gray boxes are pillars (or other visual obstructions). The Green arrow is the route two players take at the very beginning. The Blue arrow is the route the player with Deathsinger’s Power will take. The red arrow is the route the player who is in the center will take when they are told to switch.

Map made in Lucidchart

There are two ways the difficulty increases over time:

1.         The shield gets a little bit smaller every time it is passed. So it is easier as time goes on for players to think they are in the shield when they are not. Thus resulting in the shield not being passed.

2.         More/tougher enemies spawn from the portal

The three most common reasons for players to lose in this section are:

1.         The player was not in the shield when the timer ran out.

2.         The players on the totems died. Usually, this is a result of not killing their boomer fast enough.

3.         Not everyone is on the same page/paying attention.

I like these rooms because it puts a huge emphasis on teamwork. While it is tough and many people believe it is impossible to win after a player dies, I know it isn’t. (our record is 2 players dying and we were still able to come back and finish it.) I particularly like how it isn’t difficult based on how much damage the players need to do on a boss or anything like that. Players lose mostly because of human error, they just missed something, or lost engagement for just a second. This style of design I enjoy the most because I don’t have to grind and then just cheese a boss. Regardless of how powerful my guardian will become this section of the raid will always be difficult because it is mostly based on players focusing, listening, and working together. Regardless of how skilled I am, our team is only as good as our weakest player and it really shows here.

I will continue my look into the King’s Fall Raid next week, when we look at another encounter. This time with a particularly nasty pair of sisters. I would like to thank KackisHD, his videos supplied me with the images I needed for the center room and the right room. (more of his work can be seen here: https://www.youtube.com/channel/UCLM1eE8w_DZ89n4yIxVbffA ) And GF LaserBolt for the image of the left room. (more of his work can be seen here: https://www.youtube.com/channel/UC5kbCDveYQUcxoOll5NKocA ) This post would have taken considerably more time if I had to capture the video myself.

Thank you for your time and I’ll see you guys next week,


Scott

If you like my work and want to support my caffeine addiction, please consider donating to my Ko-Fi.

 Check out part 2 where we take a look at the Daughters of Oryx HERE!

Moments of Triumph and Raid Matchmaking

For the last month or so (Since Bungie day) I’ve been spending a lot of time, on and off, trying to complete the “Moments of Triumph” in Destiny.

I do like this design as well. Each circle filling up as you complete more of the task. Thus filling in the inner circle as well upon completion.

I do like this design as well. Each circle filling up as you complete more of the task. Thus filling in the inner circle as well upon completion.

Brief Background: The Moments of Triumph are a list of tasks for the player. A set of quests if you will, which if completed by Sept. 9th will gain the player a special emblem which will only be available to players who have done all these tasks before Sept. 9th. After Sept 9th there is no chance anyone will be able to get this emblem ever again. (In short, if the year one hard core players do everything in Destiny they will get this)

That extra HA HA! I'm better than you! Is something hard to pass up for many gamers.

That extra HA HA! I'm better than you! Is something hard to pass up for many gamers.

So what are these tasks? (Very minor Destiny Spoilers ahead)

-Apprentice of Light – Character reached the maximum level (Official level max is 20 even though the level cap is technically 34 as of right now but we’ll get into that another time)

-Light of the Garden – Defeated the dark heart of the Black Garden (Finished vanilla Destiny’s campaign)

-Light in the Dark – Prevented the summoning of Crota’s soul (Finish the new campaign missions from the Dark Below DLC)

-Light the Reef – Captured Skolas in the Vex Citadel (Finish the new campaign missions from the House of Wolves DLC)

-Bane of Skolas – Defeated Prison of Elders on Hard Difficulty (Survived Destiny’s horde mode level 35)

-Bane of Atheon – Defeated Atheon on Hard Difficulty (Finished Vault of Glass Raid on Hard)

-Bane of Crota – Defeated Crota on Hard Difficulty (Finished Crota’s End Raid on Hard)

-Public Servant – Completed 50 Public Events

-Crucible Gladiator – Won 100 Crucible Matches (Win 100 PvP matches)

-Chest Hunter – Found all Golden Chests (These are hidden chests scattered throughout the game)


Why does this matter? What can we learn from this?

1.         People love to prove they are the best. (hell, look at sports) Having this emblem is one more way of appeasing the hard core Destiny audience.

2.         From my time in Destiny I have found there to be 2 kinds of Destiny players. PvE and PvP this forces players of both kinds to cross out of their comfort zone and try something maybe they hadn’t tried before.

3.         And most importantly it forces communication between players which can create friendships. (I’ll explain in a second)


This is where we segway into a more controversial part of Destiny. Why there is no match making in Raids or other high level activities. Now this topic has been hotly debated for many months, ever since Destiny has been released and while I have flip flopped on this I would like to explain my reasoning to: A. Why I think they don’t have matchmaking in high level activities and B. Why they shouldn’t.

I mean who the hell would take a picture like this? Usually people who are friends.

I mean who the hell would take a picture like this? Usually people who are friends.

Friends. It all comes down to making friends and team building. When I want to do a raid I need to either A. Call up 6 of my friends who have Destiny on XB1 and/or B. Find people online. Personally I like to find people on the Bungie forums (Because most of my friends chose to get it on PS4. You might say I chose….. poorly). You make a post like “Looking for 5 lvl 32 guardians for the Vault of Glass Raid normal on Xbox one. Message DestinyGuy3452 for invite.” Then the invites start to trickle in until maybe 10 minutes later you have a full team. The interesting thing about this is that 99.9% of the time the players will have mics. Then you start playing the raid. Everyone is communicating working together and bonding over the struggle of beating this Raid. Fairly frequently about 5 hours later (or less depending on the skill of the team) I will have at least 3 new friends to play Destiny with. A struggle/common goal which unites players + communication creates bonds between players.

Well yeah but why can’t they just use matchmaking?

The strikes use matchmaking. And no one talks in the strikes. No bonds are created. Crucible is match made. And no one talks in the Crucible. (Except Trials of Osiris which isn’t match made. And guess what? Everyone has mics in that too)

**This is particularly strange for a console which is packaged with a headset. So there really is no excuse for people to not be using it online.

Are mics really that important?

Yes. Not only are you sharing an experience with other players, you end up talking to them. Getting to know them. It’s kind of like back in school and you were forced to sit near strangers you had never met but the teacher forces you to work in a group. Before you know it you guys found something in common and are friends.

Just to get through this part of Vault of Glass the team of 6 needs to break into 3 teams of 2 and hold their own keeping switches activated while enemies are attacking them. And not easy enemies mind you, some of the hardest in the game.

Just to get through this part of Vault of Glass the team of 6 needs to break into 3 teams of 2 and hold their own keeping switches activated while enemies are attacking them. And not easy enemies mind you, some of the hardest in the game.

A pair of metaphors if you will:

Raids/P.O.E./T.O.O. are kind of like group work. You are forced to talk and work with people for a common goal. And after you spend enough time with them you might be friends. Depending on the size of the group you might have a few new friends.

Strikes/Campaign or anything else w/o mics is kind of like working alone yes you may all have the same goal but since you are not spending time communicating there are very few if any bonds being created.

Why this phenomenon happens I can’t say for sure (Hence why this is more of a blog rather than a formal analysis). But when you force the players to find other people and they all want to do well a strange thing happens, everyone brings mics. (This could also be because these quests were designed so you will need mics and communication to even survive. I can’t imagine doing the Crota fight with no mics because two teams, the sword bearer and the guys with the rocket launchers, need to coordinate attacks at the same time) And usually everyone makes at least one friend. And we all know what happens when you have friends playing the same game as you. You guys all play more.

Just imagine if you will trying to kill this scary S.O.B. without saying a word.

Just imagine if you will trying to kill this scary S.O.B. without saying a word.

Hold on Scott, I want to do the Raids but I don’t want to do the extra work of going online. It should just be in there.

I’m going to be completely straight with you. Yes, it sucks you can’t just click a button and the Raid matchmaking launches. Yes, it sucks you may have to go out and socialize a little bit. But the only people using this particular argument are the ones who drop Destiny anyways. These are the people who would probably do the raid one time and move on to the next game. Anyone who really enjoys this game and really wants to get this end game content steps out of their comfort zone to do it. The end game high level content was built specifically to reward the hard core fans. It’s not there for everyone. (This could spark another discussion I’d like to have at another time about Does X belong to the fans? And to which ones? Does it belong to the creators? But that’s for another time) And they are willing to do the leg work to put the groups together. If you don’t want to talk to people, then the high level content probably wouldn’t work for you anyways.

How would you know?

Uh… because I did it. I was that guy thinking that there is no excuse for not having matchmaking. But I stepped out of my comfort zone because I wanted to try the raids and made a bunch of new friends by complete accident. And I’m not the only one.

What about if you added in matchmaking but forced players to have a mic plugged in?

Well you got me there. I suppose that could work. But then I ask you what about if the player has a Kinect? Or are AFK?  A troll? (Trolls are less likely when they have to actually do some work) There is something special about going out and doing the leg work to find these people. People who have a pretty good idea what they are getting into. And no one who is away from their keyboard (I’ve had too many of these in matchmaking, it infuriates me). People who really want to do this instead of just kind of trying it out. That and you’d have to think of the media storm against forcing players to buy a mic separate from the game to access all the content. I know this probably wouldn’t bother xbox one or Ps4 players but I’m not sure if PS3 or xbox 360s are bundled with head sets or not.

We're sorry you don't own a mic... so you can't play the end game content...

We're sorry you don't own a mic... so you can't play the end game content...

Bungie’s official statement is that they want players to have the best possible experience in raids. People who are AFK or don’t have mics/listen to their team ruin that experience.

So should there be high level matchmaking? If the Designers are smart they will never give in to the public outcry for it. Because it has created bonds between players, strengthened the hardcore audience and made Destiny something more than just another game for some of us.

Thank you,

Scott

If you like my work and want to support my caffeine addiction, please consider donating to my Ko-Fi.