Video Games

Update #1 on Gardens of Eden (Tenative Title)

This week is going to be a short post going over some of what I’ve been doing as far as my personal projects in the last couple weeks.

If you remember what I said last time, I was torn between a couple ideas. One focusing on a Five Nights at Freddy’s style horror game, and another based on expanding on the idea of exploration. I’ve decided on the latter because it gives me more room to experiment and try something entirely different from what I’ve worked on in the past. Additionally, I will be able to incorporate the FNaF concept if I so choose. (But that will be for another time.)

The concept I want to go with requires me to try to inspire exploration in players. To do this, I did research on other games which do just that. In particular, the game, Journey, comes to mind. In Journey, the player is inspired to explore via simply seeing a large structure in the distance. I want to reverse this concept. I want to have the players start near a large tower, and they can look out from the top of it to see everything around them. They will be able to see the various biomes to explore.

Side note: During this time, I did a lot of art research as well. I felt the need to have a better idea how I want to have the whole thing look like before progressing with more designs. But we’ll talk about some of those later.

Additionally, this tower would act as a lighthouse. The purpose of a lighthouse is to let all boats know how close they are to the shore, in essence allowing them to get their bearings. When looking at a map or trying to figure out where you are, it makes it easier to find your bearings when you have a landmark to look at. I want to help players figure out where they are at any time via simply looking for the tower.

If the players are starting in this area, we’re going to need to teach them the basics. Personally, I like to try and challenge myself by designing games, which require minimal text to teach players the mechanics. So here’s an overview of what I started with:

So let’s talk about what’s going on here:

·      We need to teach the players to jump:

o   One way to do this is to create oversized stairs. This creates a safe environment where players can experiment and learn to jump up the giant blocks. We want to force the player to learn this, so we’re going to start them in a pit with these giant stairs surrounding them in an octagon or circle. Kind of like these:

Side note: Notice how I added a stair layer. I feel like three is a better number to really make sure they know their stuff.


·      We need to teach players how to sprint as well

o   There are a couple ways to do this: one way is to have spinning blocks which the player will need to run across to cross the bridge and access a new area. But having the blocks spin actually serves another purpose. When combined with a rushing river, it can be used as a sorting device. Players who have mastered the mechanics and are able to make it across the spinning block can gain access to a more difficult area, which requires them to have a better understanding of the mechanics. If they can’t get across and fall into the river below, they get washed out to a more newbie friendly area where they can practice a little bit more before exploring the more advanced areas.

Side note: Here we can see the outside of the stairs. The part facing the river and the opposing shore. You’ll notice the stairs form a wall on this side guaranteeing that if a player falls in the river they will be unable to return.


So I want to create a pit in the beginning that the players will have to find their way out of thus teaching them the most basic mechanics. But you might ask, what about our previously mentioned tower? Well, before I go further into that, I wanted to do some more research, this time into how towers look and how pits look. This way I will have some idea as to what this whole thing will look like in the end.

I found this image of what looks like the Black Garden in Destiny to be helpful. The feeling of size and sheer cliffs along the side of the pit are particularly interesting.


This is a concept form Dark Souls 2. This concept of a lighthouse came from this image.


The idea of a tower actually came from this unused piece of concept art from Dark Souls 2 as well. The idea of the spiral stairs on the inside is the result of inverting the idea from this image. I’ll address the inner stairs later on in this post.


Last but not least, I like the feel of the roots covering the walls. This is something I really want to channel for the tower as well. The feeling of abandoned area with overgrown vegetation I think will add to the overall feeling of being alone pushing the player to explore. To find something in this abandoned place, or someone.


Okay, so I’ve found a few images to help inspire a feeling for the area. It’s time to plan out the tower:

So what’s going on here:

·      I want to poke at the player’s curiosity and push them to further learn more of the games mechanics. How can I do that?

o   If the player spawns facing the doorway with something twinkling inside, they are going to be drawn to it. But they will have difficulty moving across the water as the only path across seems to be a platform that falls quickly underwater at timed intervals.


·      Let’s talk about the platform:

o   To be honest, I don’t think the spinning platform was the best way to teach a player a new mechanic in a safe environment. They have a strong consequence if they mess up, and I feel like they should learn in a safe environment where they can fail without much punishment. So I added in the platform in the water, which is surrounding the tower. The player will see something twinkling inside and have to sprint across the platform to enter the tower. If they fail, the water will push them back to the shore they started on. This way they can try as many times as they like and easily learn the mechanic.

·      Let’s talk about the tower:

o   Here is where I screwed up. I need to do one more drawing which will show the inside of the tower. What I want to do is put stairs on the inside that have gaps in them. This will allow the player to learn to move and jump in a safe environment. If I stagger the gaps, then the player will only fall a single story down and will not die from the fall, just lose a little bit of progress. On the final jump, I want to teach the player to run and jump so the gap will need to be a little larger. Again, the gap will need to be staggered with the other gaps so the player will only ever fall one story and lose only some progress. At the top of the stairs, there is going to be a door, which the player can open to get on top of the tower.

The top of the tower was a little tricky for me. I really had to set the tone here, and because I’m such a fan of the wonder I felt throughout Dark Souls, I think I am going to try to channel a little bit of the feeling of those environments. So I decided on using a tree instead of a traditional light source. The way I see it, I can pull some lighting effects similar to the ones we see in Avatar to give the feeling of a lighthouse to those who have ventured far away. Something wonderful and beautiful that the players will never want to lose sight of but will still wish to explore around it.

This image is from the concept art for Avatar land. It perfectly depicts the kind of tree I’m going after.

Side note: I really want to channel Dark Souls here in the sense of wonder I felt traveling from the Undead Burg to the Darkroot Garden. This exact feeling is a big part of what I’m trying to achieve through this project because I found it to be absolutely fascinating. For anyone wondering, here’s a video showing you what the transition is like, though I recommend you play Dark Souls and experience it for yourself.

I'm finally going back and playing through Dark Souls 1 -- I've never been to Darkroot Basin before so this was pretty cool. Plus a Titanite Demon, neat!

Side of a side note: While I recommend watching the full video to really get a feeling of the transition, I know we don’t always have 30 minutes to spare. If you want to just see the transition of areas, watch a couple minutes at the 20 min marker then jump to 28 minute marker and watch for another couple minutes.  This will show you what each area is like and why the change is so interesting.

Here is some concept art for what I ended up sketching out. This is meant to help give me a better idea as to what I will be creating.

Things like aviaries I think we don’t see enough in games, and can be used to an interesting effect because of this. Most players won’t have experienced a green house or an aviary like this before, or at least not recently, and I’m hoping opening the door to the top of the tower will fill them with wonder and make them want to really explore. The trick here is going to be making this an absolutely jaw-dropping beautiful place. This is part of the reason I’ve decided to go with Unreal over Unity. I believe it has a better lighting system, so we’ll see what I can achieve in the weeks to come.

And that’s a little bit about what I’ve been able to put together in my free time. I’m excited to start this project, and already have many of the assets ready to go. The others I will have to create in Maya or find in the Asset store. I’m not going to lie; I am pretty excited for this project. I hope you are too!

Next week we’re going to be taking a look into the Dark Zone in Tom Clancy’s The Division. I hope you enjoyed this week’s look into my personal project, and will return next week to enjoy the analysis.

I’ll see you guys next week,

Scott
In-depth look at - Objective: Defeat Oryx, The Taken King

Welcome to part 3 of my look into the King’s Fall Raid - normal. This is the final part in my 3-part series. Again, I have broken up this post into two parts. The first part will discuss the process of players figuring this fight out. The second part will see how all these pieces fit together and I’ll briefly explain how to defeat the boss.

If you haven't read parts one (Power the Glyph) and two (Daughters of Oryx) then I recommend you do so. They can be found at HERE for Part 1 and HERE for Part 2.

**If you have yet to finish the raid and wish to go in blind, I recommend you stop reading now. Otherwise, please enjoy. **

Oryx is one of the most difficult and rewarding fights of the game. This difficulty comes mostly from the players being able to deal enough damage, and how fast they can complete each part of this encounter. Luckily, half of this fight is very similar to the daughters’ fight. If you haven’t read my analysis of that fight I recommend you check out my previous post as we will be building upon the mechanics from that fight.

Process of players figuring out each of the pieces:

Upon defeating the Daughters of Oryx the players will see a glowing orb at the edge of the map, much like the ones on the “Torn Between Dimensions” platforms. Upon approaching it, it will fly down off the cliff.

A second later, a giant version of Oryx slides up to tower over the player. This intimidating sight will cause all the players to back away from him.

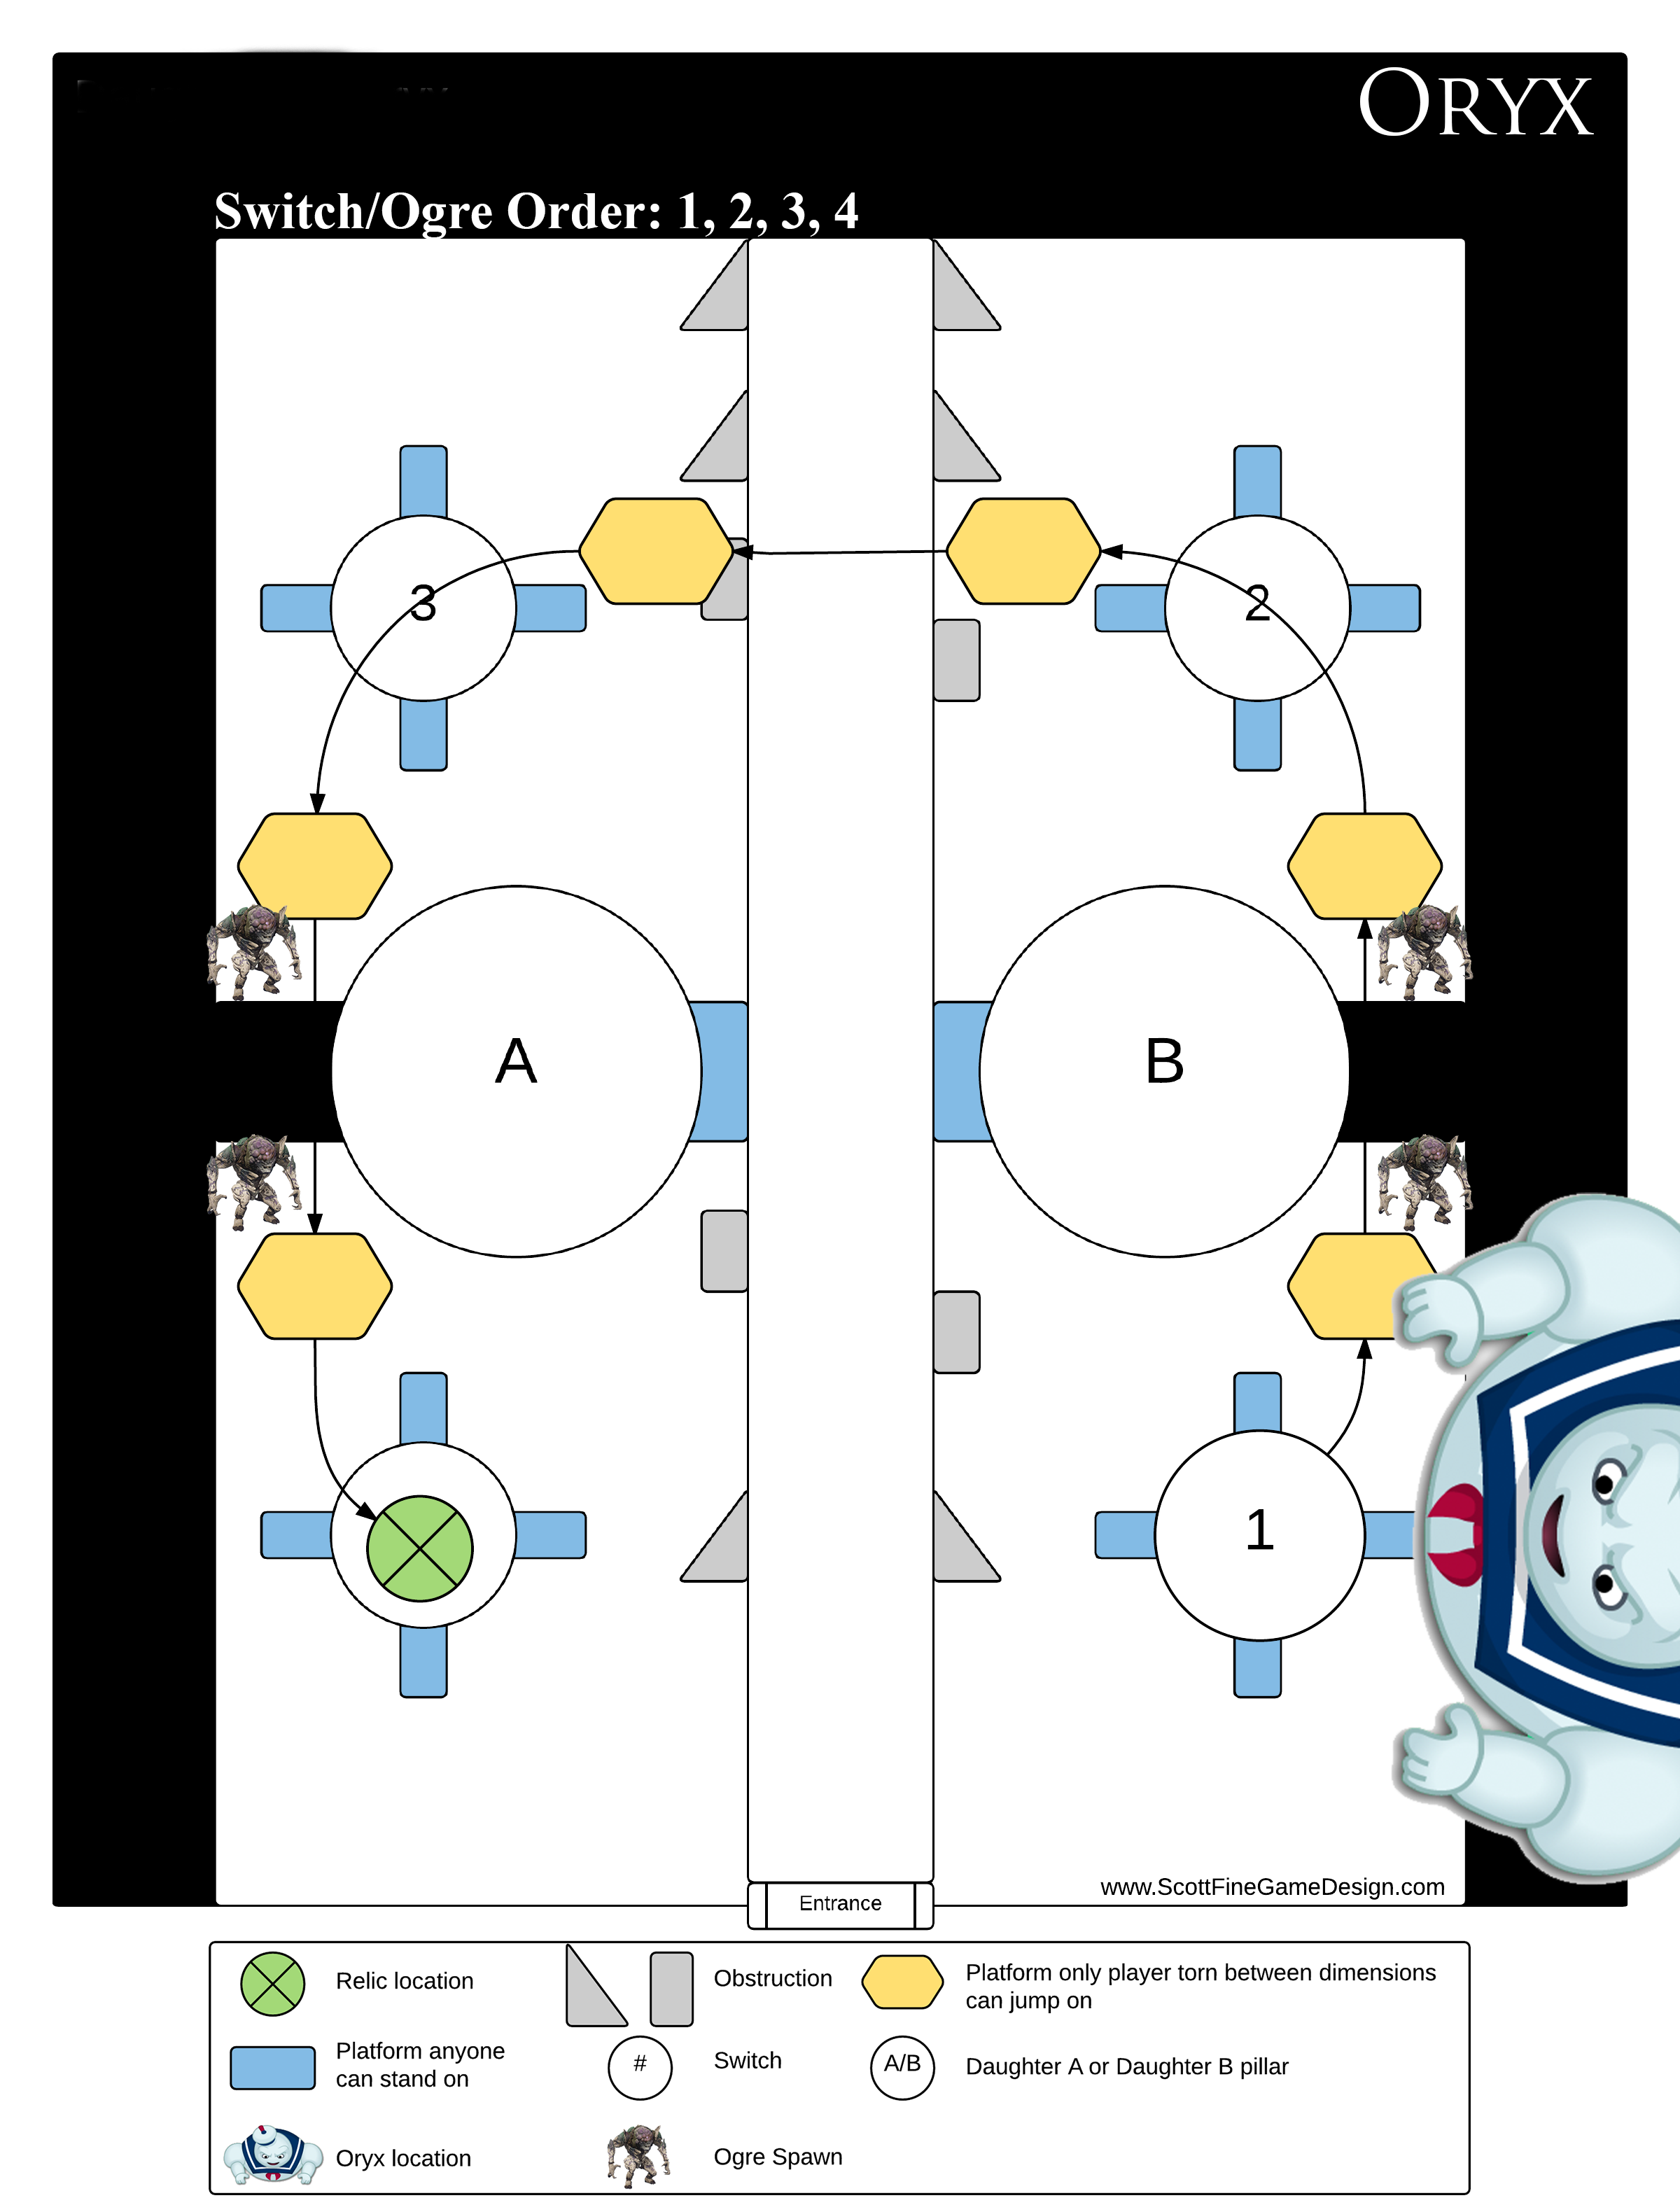
He will proceed then to spawn two groups of Taken Thralls, one between him and platform three, the other between him and platform two. Immediately after he spawns these enemies, he will additionally spawn a Taken Knight on switches two and three. Players at this point are going to open fire on everything.

Maps built in Lucidchart

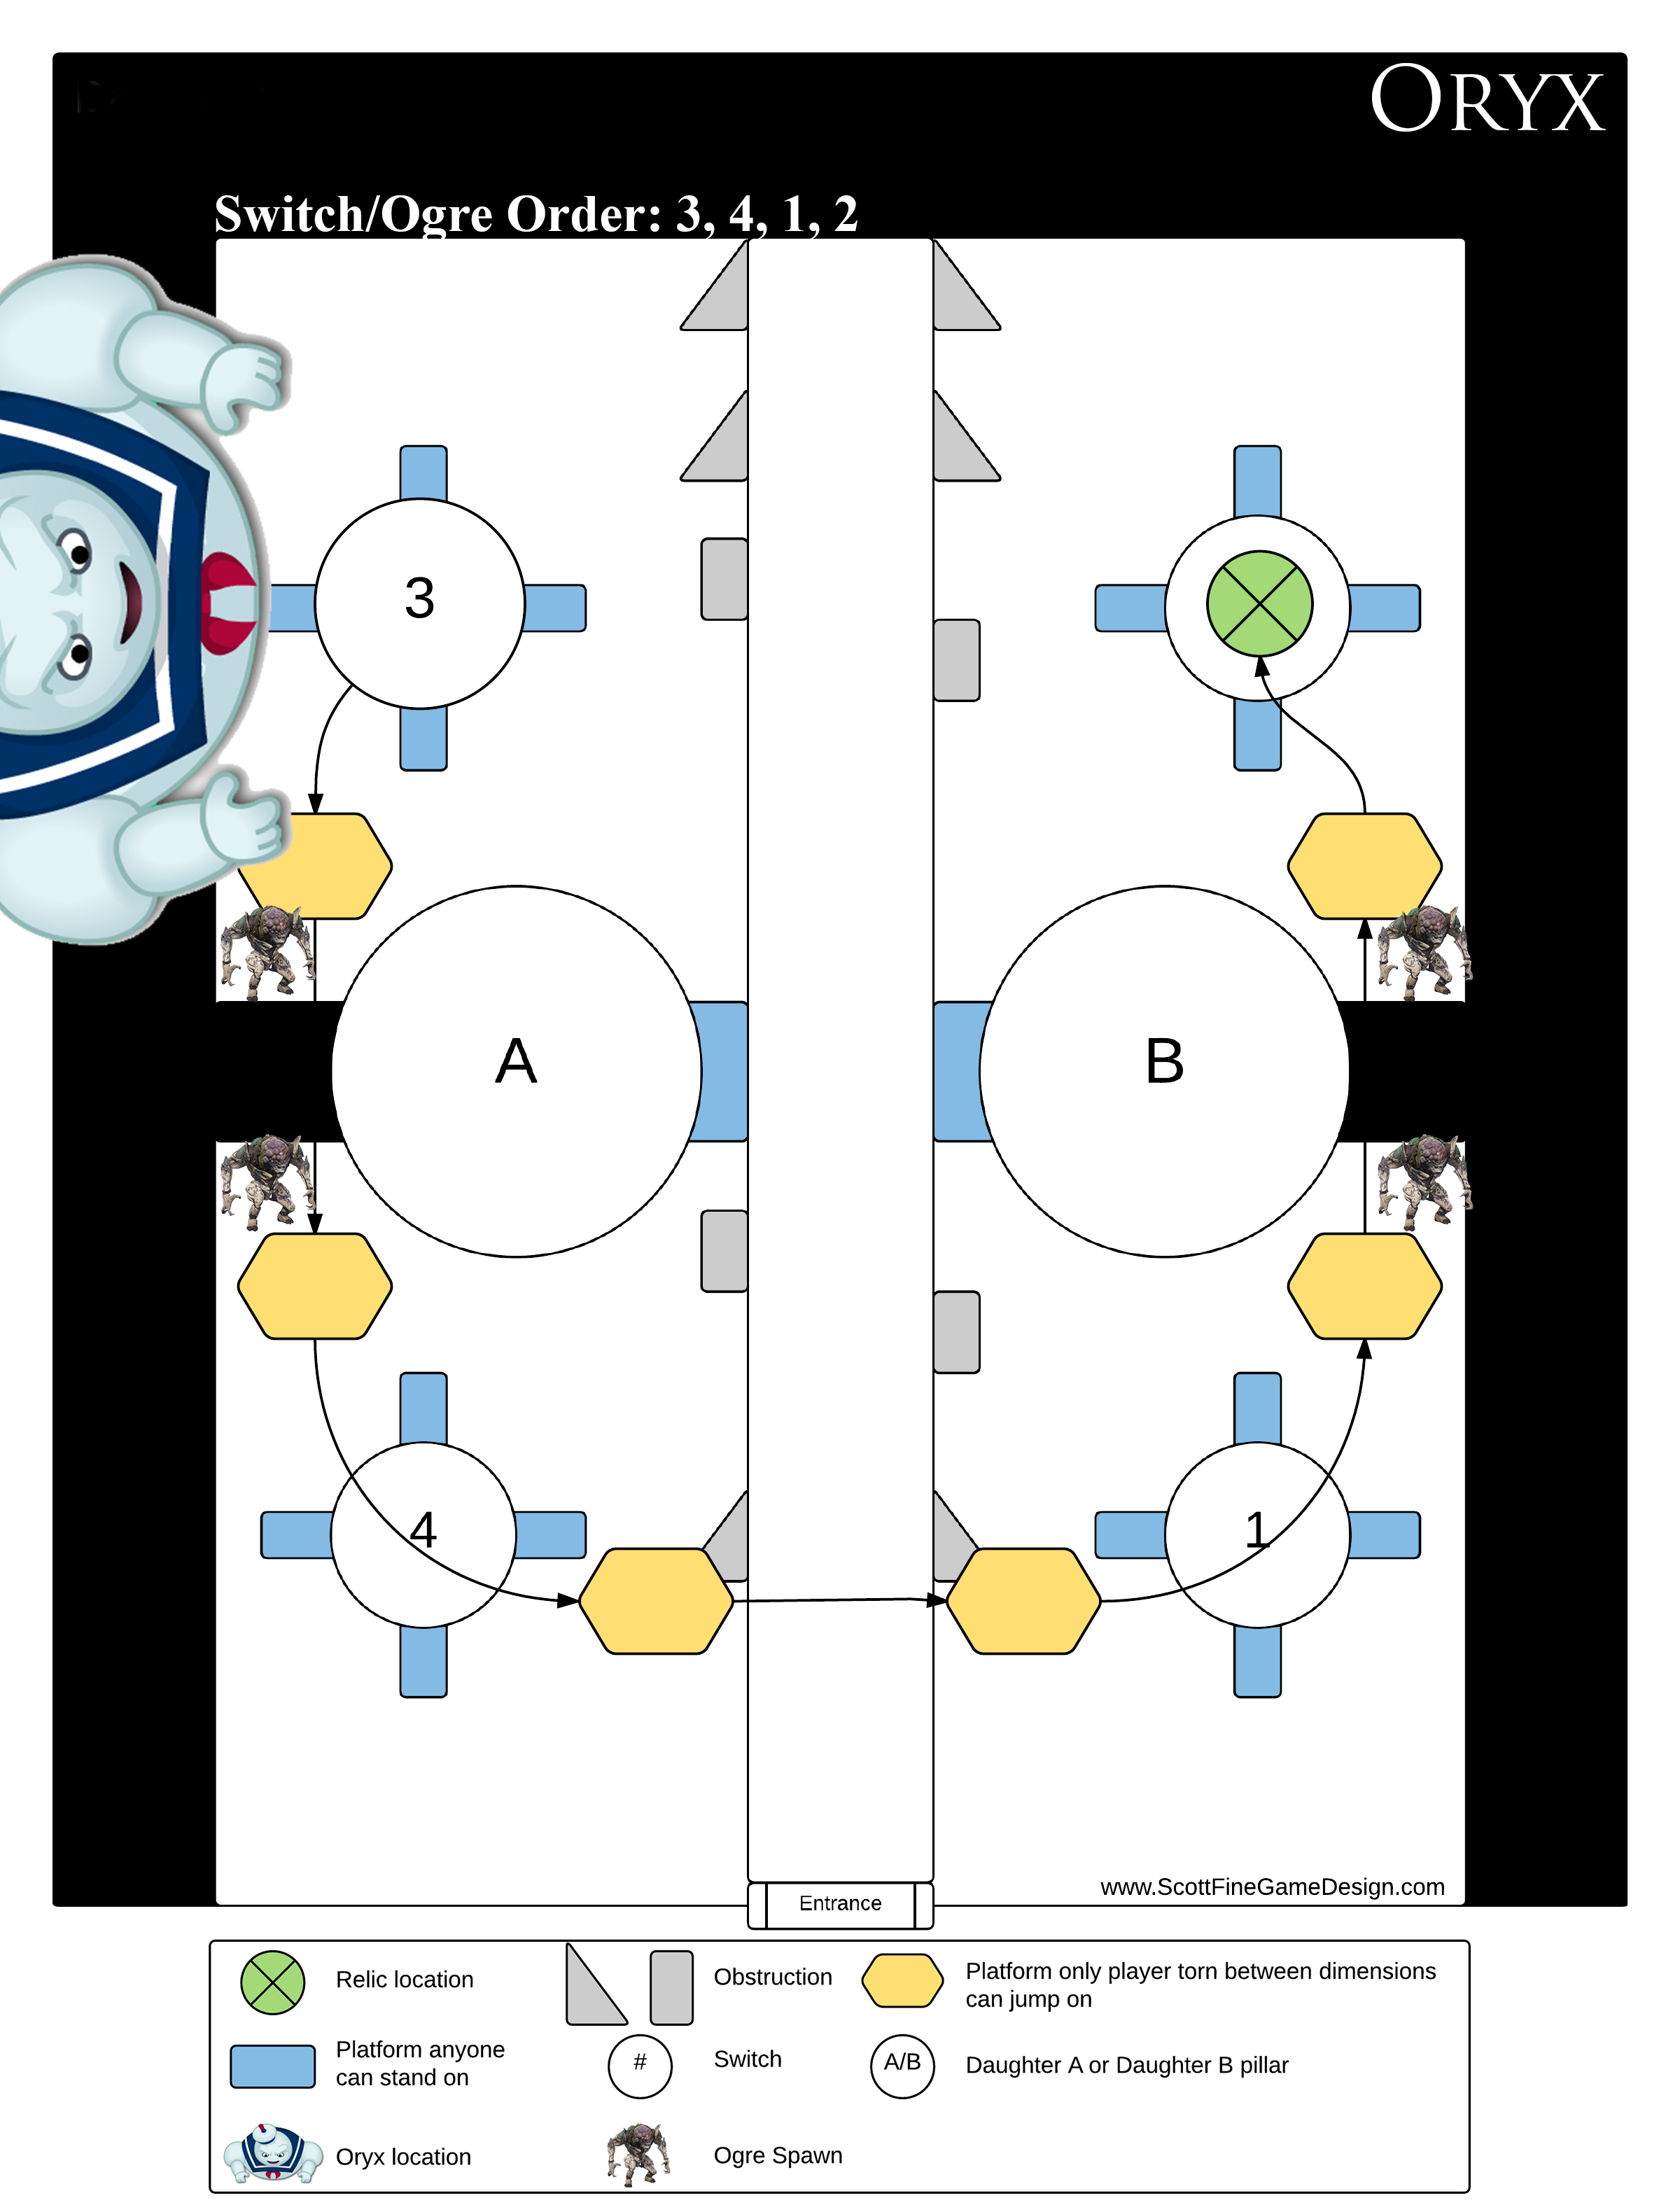
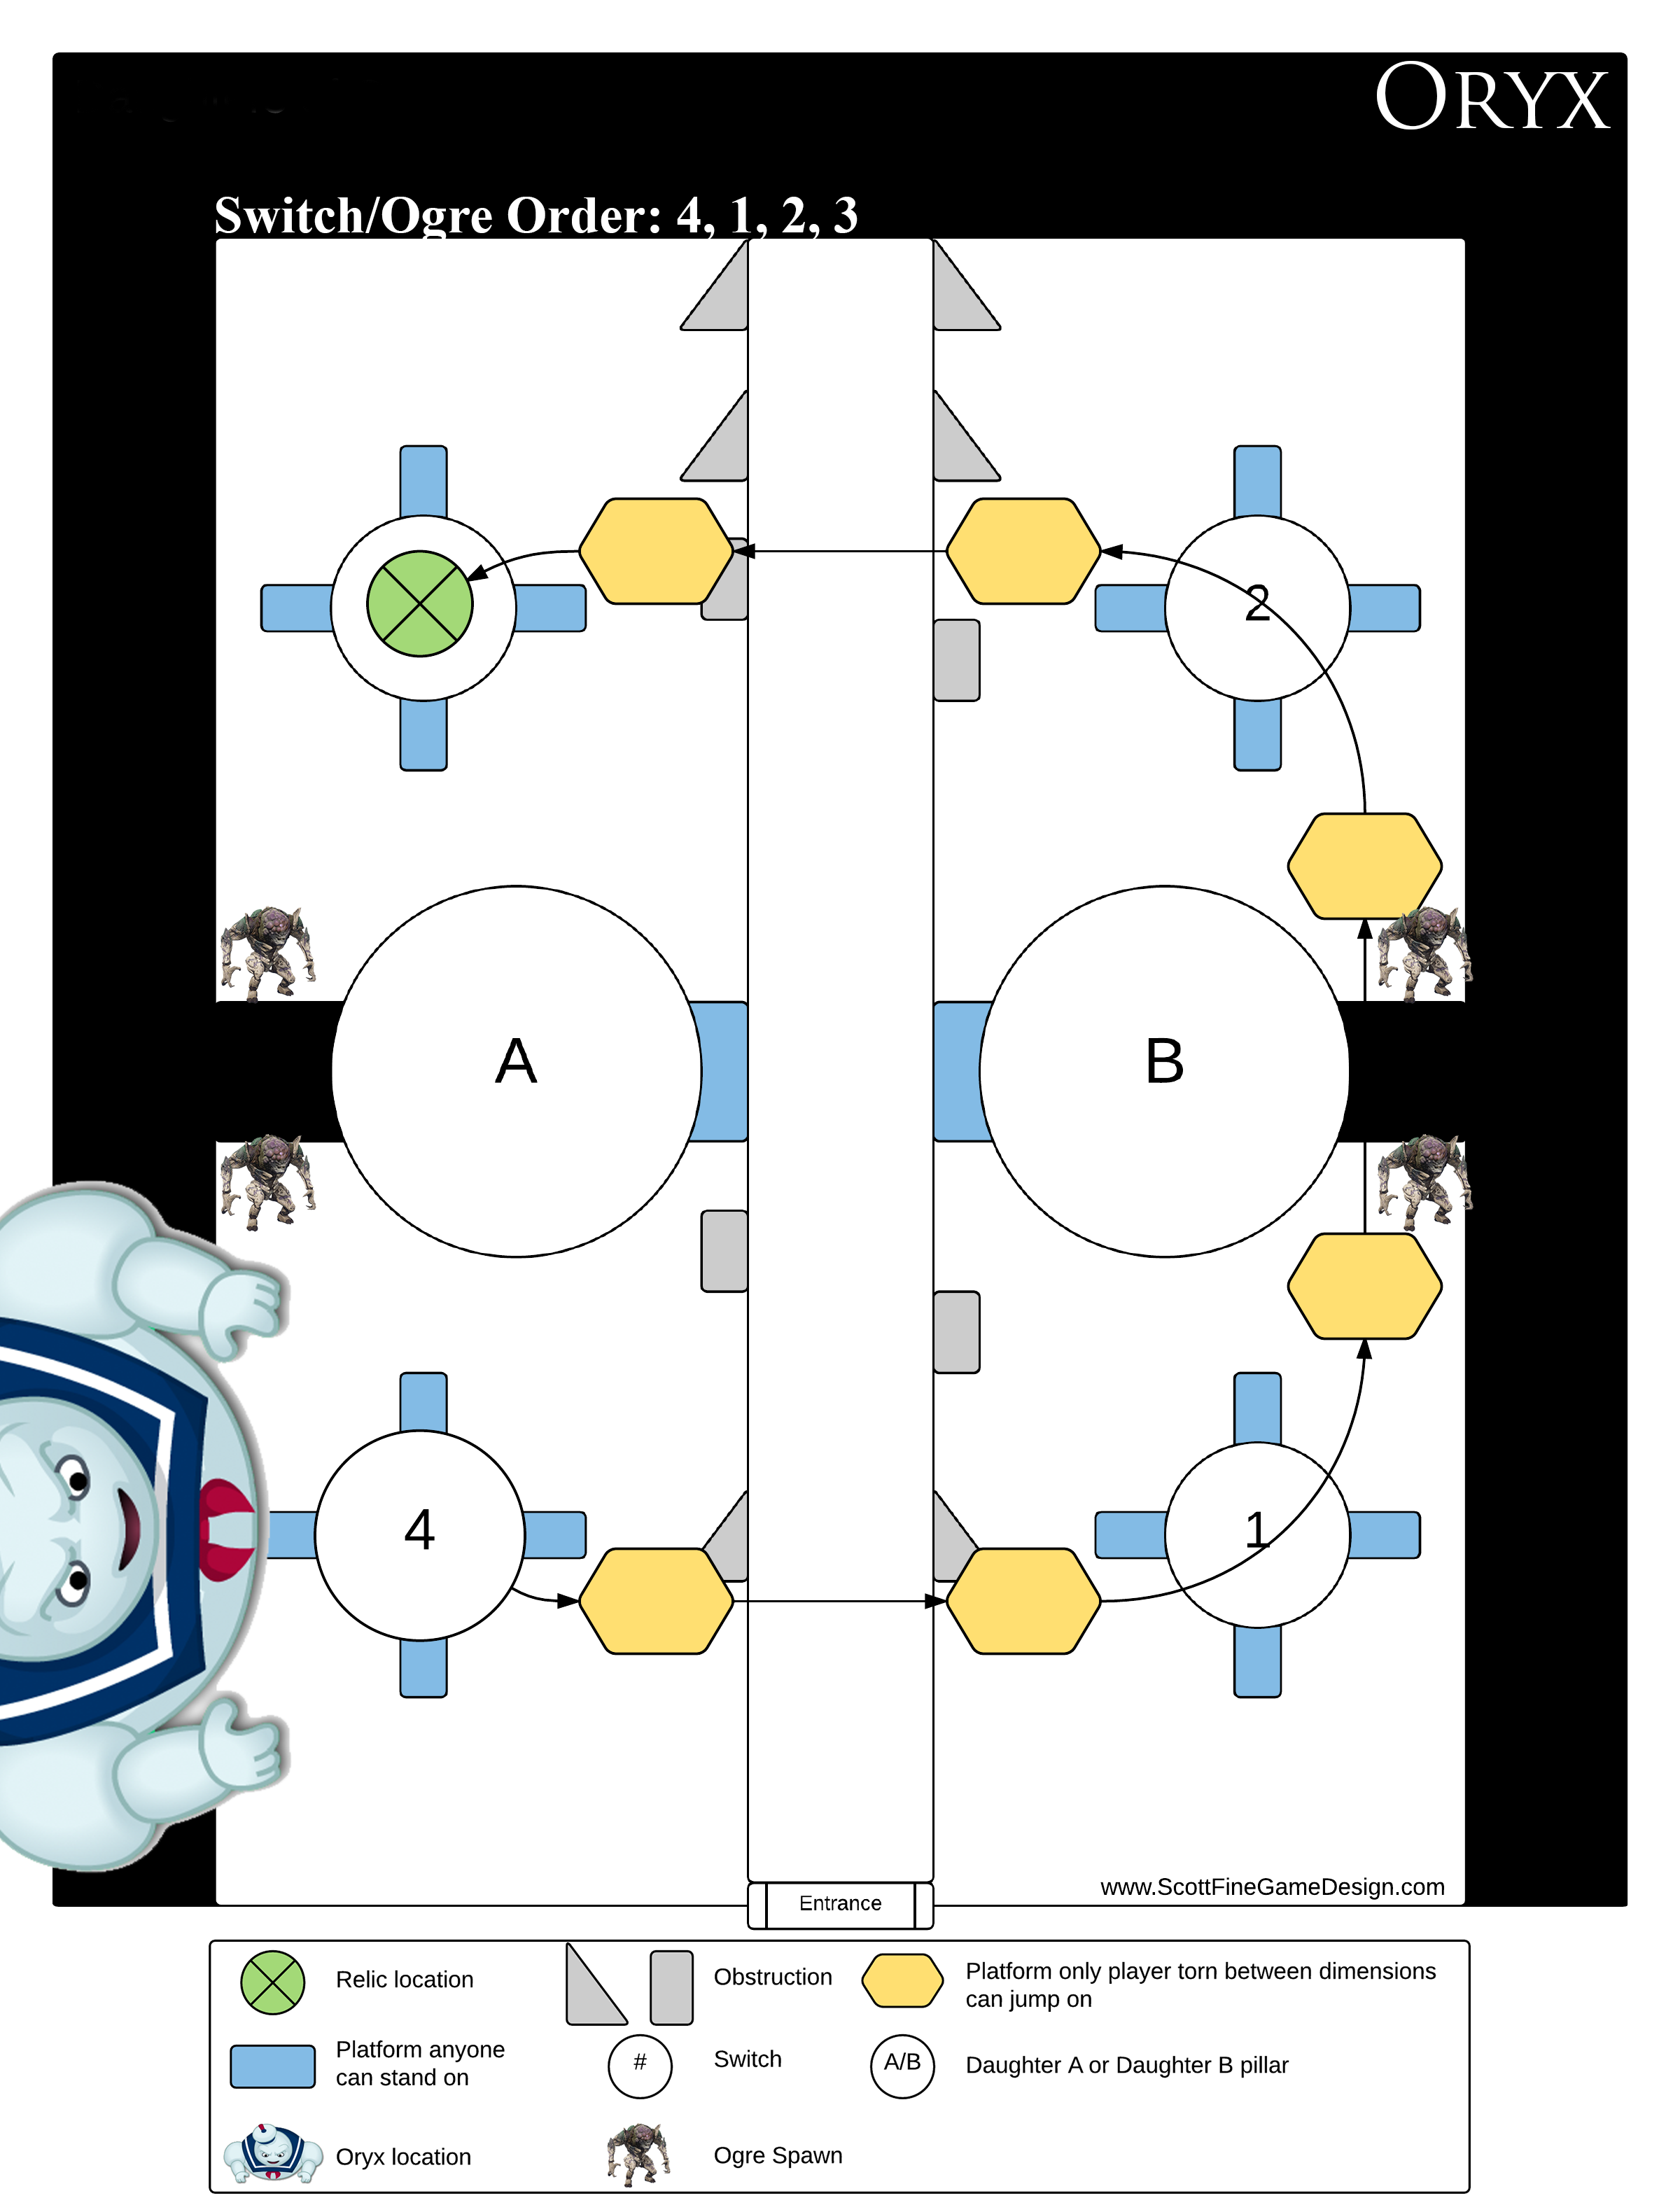
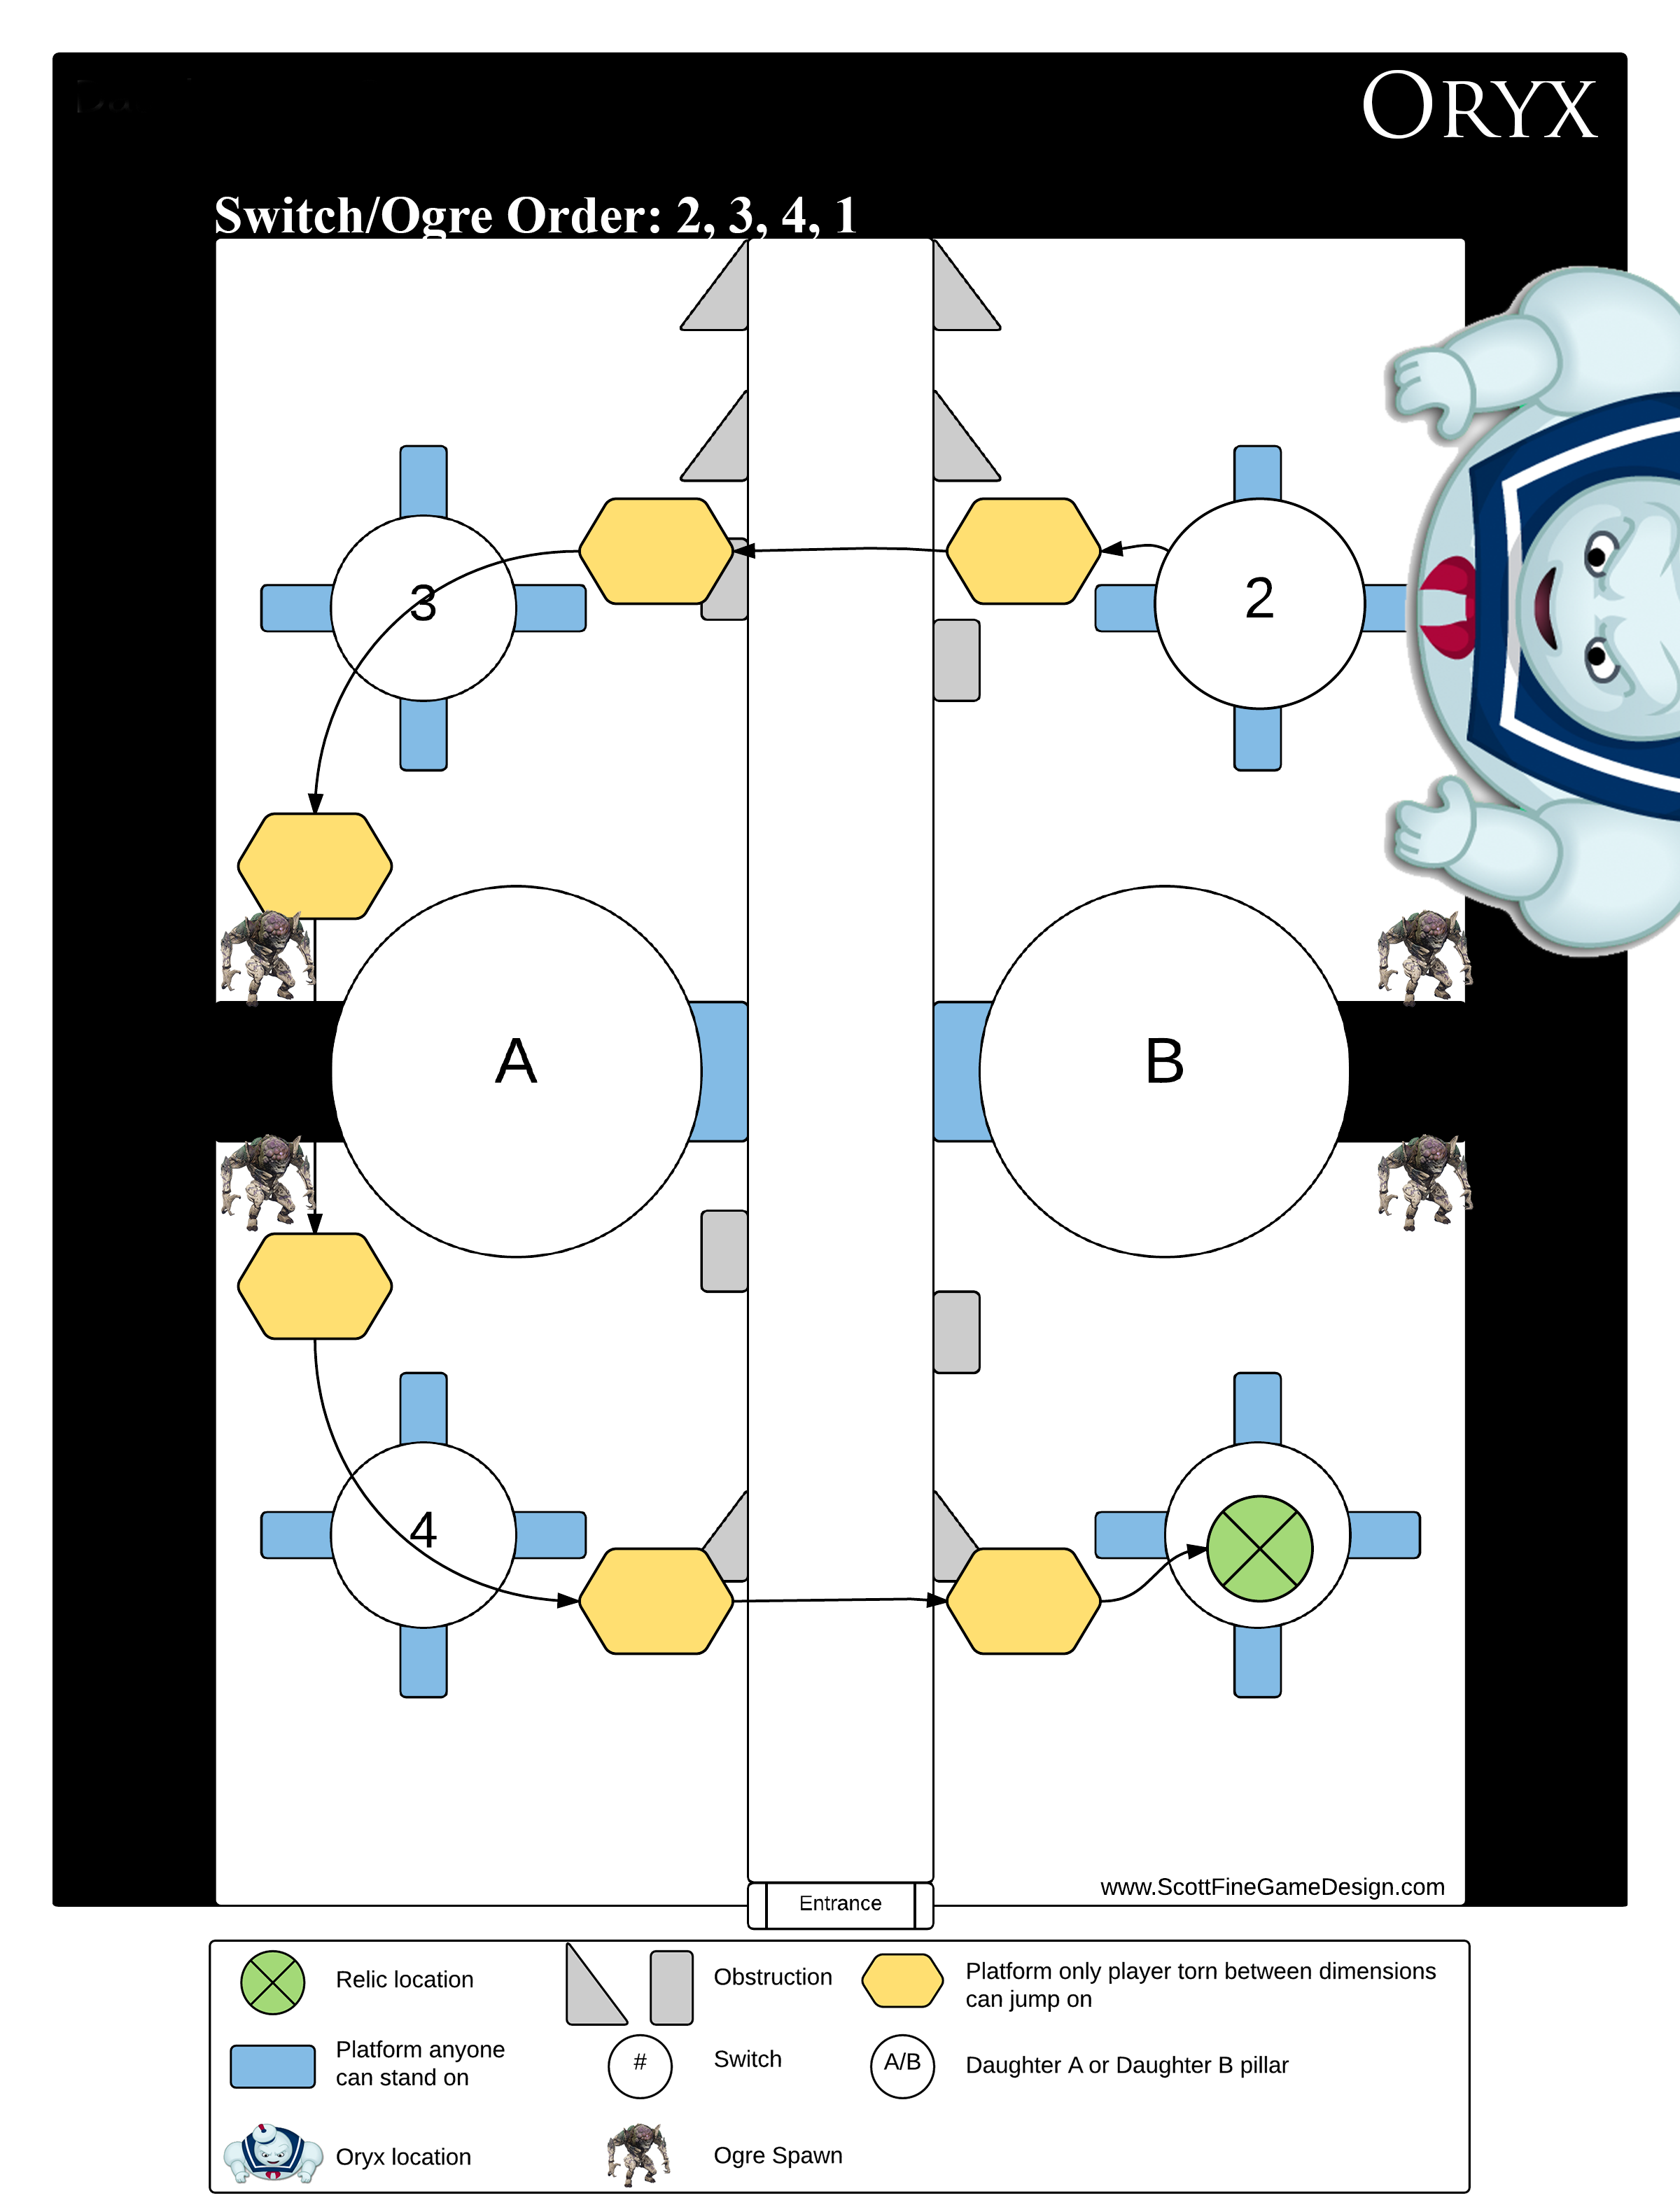
Upon killing both Knights, Oryx will either slide to switch two or three. For the first time he moves, it will be randomly chosen which of the two switches he will move to.

At this point players might not know what to do, but all eyes will be on Oryx.

Oryx will then slam the switch he is closest to. Upon raising his had again players will see he has left an orb behind. They will also notice that the icon for the relic is on their HUD again. If they follow that icon they will notice the relic has spawned. The relic always appears above the platform clockwise from Oryx’s location. When a player touches the ball on the switch they will be “Torn Between Dimensions”. Because of the Daughters of Oryx fight, this next part is fairly easy for them to figure out. They need to jump on the plates to get the “Torn Between Dimensions” player to the relic. The order is exactly the same as in the daughters encounter. At this point, the players will jump on their platforms in order and the player who is “Torn Between Dimensions” (We are going to call this player the “Runner” from now on for simplicity) will start their platforming. But something different happens this time.

A “Light Eater Ogre” spawns in the corner next to each switch. While it may seem like it, the ogres spawning isn’t actually attached to when the players activate the switches. Instead, they activate on a timer after Oryx slams the first platform. Their order of spawning additionally helps the players; it is the correct order the players need to activate the switches in.

Side note: Ogres are amongst some of the most feared enemies in Destiny. When one appears, all players have the gut reaction to kill it as fast as possible. This is largely due to the laser blast they produce will make short work of players.

Upon killing these Ogres, they seem to leave a mini blight ball behind.

Side note: This will become sort of a problem later. In the campaign players encounter larger versions of these blight balls. But the larger versions spawn enemies every so often and slow the player when they get near. They can be destroyed if players do enough damage to them. So it isn’t far fetched for players to expect these blight balls to spawn enemies as well.

Roughly about the time the runner collects the relic, they will notice a Tombship and a knight, named the “Vessel of Oryx”, with a shield running down the center of the map. This shield looks strikingly similar to the shield players stole from the daughters. In fact, because of the daughters fight the runner will attempt to steal the shield again.

Once the players have the shield, their gut reaction will be to huddle up inside it and shoot Oryx. This is because that’s exactly what the players did to the daughters. The shield grants them immortality just like the daughters’ shield. There is a good chance they will forget about the “Vessel of Oryx” the first time. Upon firing on Oryx though, they will notice he is not taking any damage. This confuses players because they were able to shoot the sisters immediately after they stole their shield. But it isn’t a big deal, because a few seconds later Oryx will slam his fist on the switch he is closest to and his chest will open up and glow.

In video games, there are not many things more obvious than lit up spots on bosses. It usually signifies a weak point. So the players open fire on his chest. The players will be able to stun Oryx by doing enough damage to his chest. If players don’t do enough, he will clap his hands together and kill everyone.

Upon stunning Oryx though, a fairly large problem rears its ugly head. Oryx does his stun animation, and players will think they need to just keep shooting his chest to do damage. Unfortunately, shooting him doesn’t actually do much damage at all. In order to do major damage to Oryx, players will need to run to the blight balls and detonate them.

This is a fairly large issue. Because the entire game players are taught to destroy and avoid these blight balls. So there isn’t anything in place messaging to the player that they need to stand in the blight ball’s aura.

Side note: This is a tough one. Perhaps displaying something along the lines of “Blight Balls are ready” or even “Enter the darkness…” on screen might help to better message to the players that they need to enter the blight balls. I know they are technically called “Corrupted Light” but they look exactly like miniature versions of the previously introduced blight balls.

Luckily, once a player accidentally enters one of these balls for a few seconds, the players will notice a message “[Player Name] has detonated a Corrupted Light”. In addition to the text, the Corrupted Light will turn white and have particles spinning around it. Hopefully, they activated it at the proper time while Oryx was stunned, or else it wont do any damage. If they don’t have the shield when it is activated, it will kill all the players a few seconds after the message is displayed. This creates another issue with the players learning how to use them, as it would reinforce the need to avoid these balls. If they do have the shield though, everyone inside will survive the blast, teaching the players to head back to the shield as soon as the Corrupted Lights are detonated. Through trial and error, they are able to finally figure out when exactly to detonate the Corrupted Light.

Side note: Remember the “Vessel of Oryx”? In normal mode the Vessel’s sole purpose is to transport the shield to the players. Players do not need to defeat it though it is recommended, as he will attack the players when they are detonating their corrupted light.

Now the players have figured out how to finally do some real damage to Oryx. Everyone is cheering, everyone is excited. That is, until Oryx falls away and reappears in the front of the battlefield, the same place he started the encounter at. As he pushes himself away from the battlefield, players will begin to notice green/white circles appearing around them. The first bomb (depending on the player’s light level) might not kill them, though it will come very close. This likely would panic the players, teaching them to run like mad to escape these explosions. Unfortunately, this can result in some of them getting too close to one another, causing multiple deaths. They will learn to run while staying away from one another. The bombing sequence lasts about 20 seconds in total.

Upon completion of the bombing sequence, Oryx will slide his way to another random switch. This time however, switch one and four are fair game for him to slide to as well. This whole process starts again.

New players will get comfortable with this process fairly quickly. The toughest part is killing the Ogres, but once they figure out their preferred method to defeat them, it seems easy. Then Oryx throws a wrench into the mix.

Once he is at about half health, Oryx wont bomb the players anymore. Instead he will start to remove them from the battlefield one by one. He does this by teleporting players to the “Darkness Dimension”.

The first time he does this, players may not be ready for it and may accidentally touch the giant black ball Oryx spawns on the battlefield. This will instantly kill any players who touch it. This teaches them to stay the hell away from it.

Players still stuck in the main battlefield will be confronted by a Taken Knight on switch two and three. In addition to the two Taken Knights, Thralls will begin to spawn next to switch two and three as well. Except, these Thralls wont focus on killing the players on the battlefield, instead intent upon traveling into the black ball. Players who are communicating will quickly realize that the Taken Thralls who enter the black ball appear in the “Darkness Dimension”. Players on the outside can easily figure out that they need to help their allies by killing as many Thralls as possible.

One by one, players will be teleported from the main battlefield into the “Darkness Dimension”. Once inside, they will see a “Shade of Oryx” warping around the outskirts of the “Darkness Dimension”. This is a very familiar fight to players who have played the campaign. One of the final missions of the campaign, “Regicide”, involves the players fighting Oryx (at his normal size) in the “Darkness Dimension”. Players inside the “Darkness Dimension” will have no trouble figuring out that they need to kill the shade as quickly as possible. Initially there is nothing else to shoot at or draw the player’s attention, a good thing as the shade is a little difficult to see.

Side note: This fight can be a little confusing though. Because in “Regicide” we are taught that while Oryx is on the Outskirts of the “Darkness Dimension” we cannot do damage to him. But here in the raid players can, and should, damage the shade while he is on the outskirts of the level.

Every so often the Shade will travel towards the players with it’s sword raised, ready to attack.

Because of the “Regicide” mission, players know to avoid this attack as it can be devastating. Players will continue to damage to the shade until it is dead or the final player is teleported into the “Darkness Dimension”. Upon the final player being teleported in, the players will have only a few more seconds to kill the Shade before they themselves are all killed. Upon killing the shade, the “Darkness Dimension” will dissolve, and the players who were inside it will find themselves where the black ball in front of Oryx used to be.

Upon completing the “Darkness Dimension” section of the raid, the players have experienced and figured out every different challenge Oryx has to offer. Oryx will shift to stand in front of a switch again, and the players will know what to do from there.

Once the final Corrupted Light detonates and Oryx’s health seems to be empty, players will celebrate. They will soon find out that celebration was in vain when he reappears in the front section where he initially spawned.

Hopefully at this point the players will not run away and have their special and heavy weapons reloaded. Because Oryx will rise up and attempt to do his clap attack one more time which will result in killing all the players. Thankfully, by this point all the players should be familiar with this animation and see it coming from a mile away. His chest will open up as he prepares to kill the players. If they can deal enough damage to him, they will win. If not, he will kill them all and they will have to start the encounter over again.

The final section of this post, “How to put the pieces together”, I am going to do in a brief step-by-step format. I feel as if this would be easiest for me to explain without having this post drag on for 50 pages.

How to put the pieces together:

Steps:

1.     Approach the floating orb near the edge of the level. Oryx will spawn at the edge.

2.     Kill Taken Thralls which Oryx spawns, followed by killing two knights on platforms two and three.

3.     Oryx moves to a switch.

4.     Oryx slams the switch in front of him with his fist. This spawns an orb which will turn the player who touches it to “Torn Between Dimensions”

5.     Player who is the chosen runner will collect the orb and begin making their way around the “Torn Between Dimensions” platforms.

6.     The players who have switches assigned to them will have to jump on their switches in counterclockwise order to spawn the “Torn Between Dimensions” platforms.

7.     Upon activating a switch, a “Light Eater Ogre” will spawn next to each switch in the order they were activated.

8.     The players, while remaining on their switches, must kill all the Ogres as quickly as possible. The sixth player can move around the center and shoot Ogres to help kill them.

9.     Where the Ogres die, a Corrupted Light will spawn. All players must avoid the Corrupted Light at this time.

10.  Once the runner has collected the relic, they must travel to the edge of the map where Oryx initially spawned. Here they will see a knight named “Vessel of Oryx”. They will need to slam the relic into the knight to steal his shield. The runner will then need to kill the “Vessel of Oryx” and make their way to the center of the map between the two giant pillars which the sisters were on.

11.  Upon the runner collecting the relic all players need to get off their switches, finish off any remaining ogres, make their way to the center to help kill the “Vessel of Oryx”, and enter the shield.

12.  If the players did steps 2-11 fast enough, they will have time to see Oryx slam the platform he initially slammed during this cycle, and then “Call upon the darkness”. While he is calling upon the darkness, his chest will open and light up. All players will need to shoot him in the chest. If they do enough damage to him they will stun him. If not, he will kill them all when he claps.

13.  Once he is stunned, the players will need to run to the blight balls closest to their switch (Where the ogre which spawned next to their platform died). They must sit in the ball until the screen says “[Player Name] has detonated corrupted light”. Once that text appears on screen they must run back into the shield held by the runner.

14.  This will cause massive damage to Oryx. The more balls detonated the more damage will be done to Oryx.

15.  If Oryx still has any health left, go to #16. If his health seems to be empty go to #20

16.  Players need to pay attention to Oryx when he comes back up in the spot he initially spawned. If he summons a black ball in front of him skip to #18. If he pushes away from the battlefield, then he is going to bomb the players. The four players who had switches need to run in circles around their switch. The other two players need to run in circles at either side of the battlefield (One near where Oryx initially spawned, the other near the entrance)

17.  Once Oryx is done bombing the battlefield, go back to step 2.

18.  The black ball is summoned. Oryx is going to teleport players one by one to another dimension. Players who have yet to be teleported will need to kill the two Taken Knights which spawn on switches two and three. They will then need to kill Taken Thralls which spawn nearby switches two and three. If the thralls are not killed, they will enter the black ball and attack the players who have been teleported.

19.  Once a player is teleported they must kill the “Shade of Oryx” inside the “Darkness Dimension” as quickly as possible. The Shade will warp around the outside of the “Darkness Dimension”. Every once in a while he will light up and raise his sword, slowly moving towards a player. He will then slam his sword down and attempt to kill the player. Once the last living player has been teleported to the “Darkness Dimension”, they will only have a few more seconds to finish off the “Shade of Oryx” or all players will be killed. Upon killing the Shade of Oryx, the players will be brought back to the battlefield. Go to step 2.

20.  RELOAD ALL YOUR GUNS! Oryx is going to spawn in the front of the battlefield where he first spawned at the beginning of the encounter. His chest is going to open up again, so all players must unload all their best weapons on him here. If the players do not do enough damage, he will clap and kill everyone. If the players do enough damage, he will die and the players will have won.

21.  Dance!

With the right team, this is easily the most rewarding section of the raid. It forces every player to be at the top of their game, works as an excellent team building exercise, and also builds on previous encounters. While it is not perfect (The corrupted light issue being the biggest problem I see with it), I still find it to be the most rewarding experience in Destiny.

This concludes my three-part look into the King’s Fall Raid in Destiny. If you enjoyed this series, please let me know. If you didn’t, please let me know what I could do to improve. I enjoyed doing the research and analyzing this raid, and would be more than happy to go into detail about the other parts if there is a demand for it. I could probably talk about it all day and not get tired of it. I would like to thank KaliksHD for his high definition videos. I would not have been able to create this post without them. (More of his work can be seen here: https://www.youtube.com/channel/UCLM1eE8w_DZ89n4yIxVbffA ) The images I used from his videos are the ones which have no watermark. I would also like to thank Briar Rabbit for his videos from a different angle. (More of his work can be seen here: https://www.youtube.com/channel/UC02QCCz8STKVGEDS4VCsL4g ) The images I used from his videos have his watermark in the bottom right corner. And finally, last but not least, I would like to thank you, the reader. I hope you enjoyed reading this post as much as I did writing it. If you have stuck with me through this entire series, I would like to give a huge thank you for giving me your time. I really hope we can all create better games by looking at some excellent ones.

Next week we will be either looking into Angry Birds 2 or the difference between King’s Fall hard and normal mode. I haven’t quite decided yet and both ideas excite me. When we get to Angry Birds 2, we will also begin to think about how it makes the player feel in the moment to moment gameplay. And I don’t mean just making the player feel smart.

I’ll see you guys next week,


Scott
 If you like my work and want to support my caffeine addiction, please consider donating to my Ko-Fi.

Jetpac (1983) A Retro Analysis

With the release of Rare Replay, I’ve had the chance to play a few games I had never heard of. One of which was Jetpac.


Objective: In Jetpac the player is an astronaut exploring other planets. Unfortunately, these planets don’t always have the friendliest of occupants. So their job is to construct a ship and fuel it without getting killed by the aliens. They can collect bonus items for extra points. Once they’ve fueled up their ship they need to get back to it to take off.

**Side note: The player only has to construct the ship once every 4 levels. When they are not constructing it they are just collecting fuel.

Simple enough.

What can the player control?

Shooting, moving left and right, and thrust upward.

Where does the fun come from?

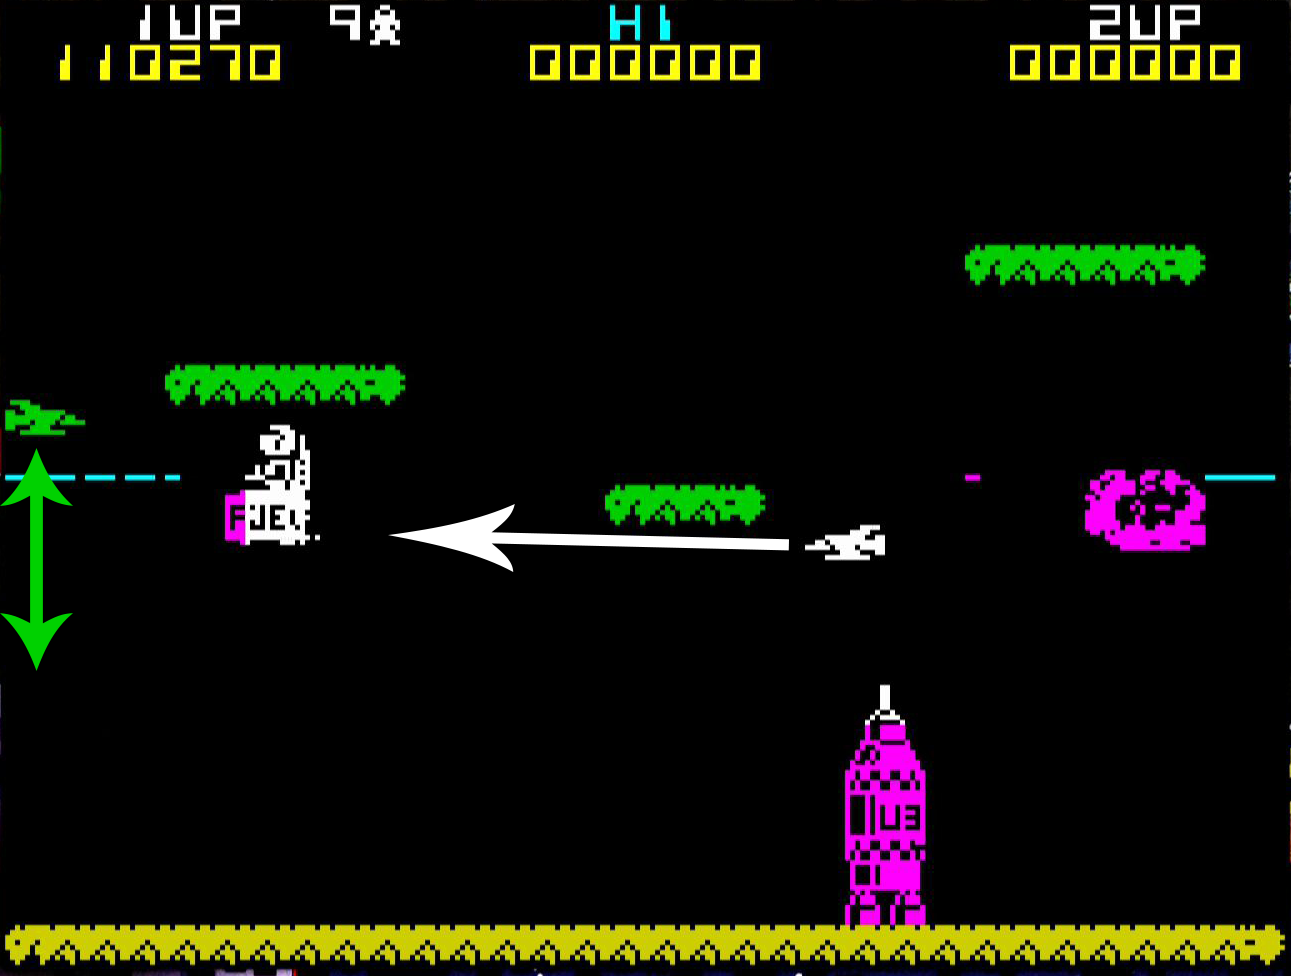
Figuring out each planet’s inhabitant’s movement patterns. The first planet (Seen above) just has enemies flying left to right or right to left. They don’t change direction and they don’t seek out the player. This is a perfect learning level because they are not too fast and are fairly easy to avoid/kill. This allows the player to experiment with the buttons/ controller and figure out how to play. The next level the enemies move only diagonally but this time they bounce off surfaces so it changes their direction, increasing the difficulty. Next are bubbles which can travel either diagonally or horizontally bouncing off surfaces. You get the idea. Eventually there are some enemies which chase the player via moving up and down or side to side.  It’s fun to “outsmart” and out maneuver these aliens.

So where’s the risk reward?

Some of the rewards consist of additional points, the reward of getting a cooler looking ship, getting to see a new planet/alien race (Additional challenge/exploration) and the “Cinema” of the ship taking off and the player escaping the planet.

The risk is where it gets interesting. If we were to just have to kill the aliens to get points, then a player could easily stay on the top right platform and kill aliens. The risk is small and the reward the player receives is also small. (a few points and little challenge. Not very fun.) But the designers fixed that by forcing the player to build the ship. This forces the player to move from their secure hiding spot to retrieve the piece needed and return it to the ship. (Increased risk/challenge for an increased reward) Forcing the player to get out of their safety zone like this is clever but the Fuel kicks it up a notch.

 Once the ship is completed a fuel canister will fall randomly from the sky. This randomizes play and helps to keep the player on their toes because they don’t know where it is going to spawn. When it does it can be easy to obtain like the one in the image above (Somewhere in the middle of the screen) or incredibly difficult. (On the edges of the screen)

Why is it so difficult to get the fuel canisters on the side?

Because that’s where the enemies spawn. And immediately before the enemies spawn the player has no idea as to where on the side they are going to spawn. Another reason is that when a player goes off the right side of the screen they return on the left side of the screen. This applies to enemies as well so players will have to be extra aware. In this situation I have found it to be the best strategy to stop killing enemies. Because only a certain amount can spawn. This way they wont have them spawn on top of the player and killing them.

As we can see here in the first level the enemy explosions match the color of the enemies destroyed. We have a collectible which the player can retrieve for additional points. The Fuel has fallen and is now resting waiting for the player to retrieve…

As we can see here in the first level the enemy explosions match the color of the enemies destroyed. We have a collectible which the player can retrieve for additional points. The Fuel has fallen and is now resting waiting for the player to retrieve it. And we have two enemies flying across the bottom of the screen.

By level 3 we can see the enemy movement has changed to make them more difficult to deal with. While still predictable they move in a larger variety of directions creating a more difficult scenario for the player.

By level 3 we can see the enemy movement has changed to make them more difficult to deal with. While still predictable they move in a larger variety of directions creating a more difficult scenario for the player.

In later levels we have enemies which will seek the player. These jet like enemies will travel up and down the sides of the screen a couple of times. Then turn white and charge at the player. If they hit something on the way they explode. The predic…

In later levels we have enemies which will seek the player. These jet like enemies will travel up and down the sides of the screen a couple of times. Then turn white and charge at the player. If they hit something on the way they explode. The predictable movement of all the enemies makes the game considerably less frustrating.

Little design decisions often overlooked which I like:

  • The player can tell how fueled the ship is based on how purple the ship has turned. (Purple is also the color of the fuel canisters)

  • The aliens are all different colors. This make it easier for players to track them and their movements when they are all close together.

  • The aliens explode the same color which they are. This helps the player to track which enemy they killed.

  • When the player is holding a ship piece or fuel cell and they travel above the ship they automatically drop the item they are carrying into the ship so the player can focus more on not dying.

  • It’s all on one screen. This means it is considerably easier for the player to track what’s going on and what they need to do.

  • The enemies spawning on the sides of the screen gives a feeling of them traveling from elsewhere to come into the player’s field of view.

I like this game because it is (for the most part) incredibly fair. Meaning when the player dies 99% of the time they see it coming. As in they are too slow react or made a mistake. When a game is fair like this it makes it feel less frustrating when a player loses. They are less likely to throw their controller at the T.V. and instead continue playing. The predicable movement of the enemies contributes to the game not feeling cheap. And the challenge/puzzle of figuring out the best way to tackle each planet, combined with the skill of maneuvering, make for an interesting game.

Thank you,

Scott

If you like my work and want to support my caffeine addiction, please consider donating to my Ko-Fi.

Sidebar: As I was playing this game and thinking about the enemy movements I couldn’t help but think harder into the story of the game. The first aliens the player meets don’t chase the player they just go about their business leaving the player alone unless they float into the them. It makes me think that these creatures are not necessarily sentient. Or at the very least unable to control their own movements. But as the game progresses the aliens begin to hunt the player and directly attack them. I wonder if the aliens somehow communicated with each other and told one another about the astronaut who is shooting them up as he travels from planet to planet. Much like Shadow of the Colossus where the first couple colossi don’t really attack the player but the later ones hunt the player. But I’m probably overthinking it and just having fun.